Not long ago, I wrote an analysis of the distributed transaction middleware Fescar. Shortly after, the Fescar team rebranded it as Seata (Simple Extensible Autonomous Transaction Architecture), whereas the previous Fescar's English full name was Fast & Easy Commit And Rollback. It can be seen that Fescar was more limited to Commit and Rollback based on its name, while the new brand name Seata aims to create a one-stop distributed transaction solution. With the name change, I am more confident about its future development.
Here, let's briefly recall the overall process model of Seata:
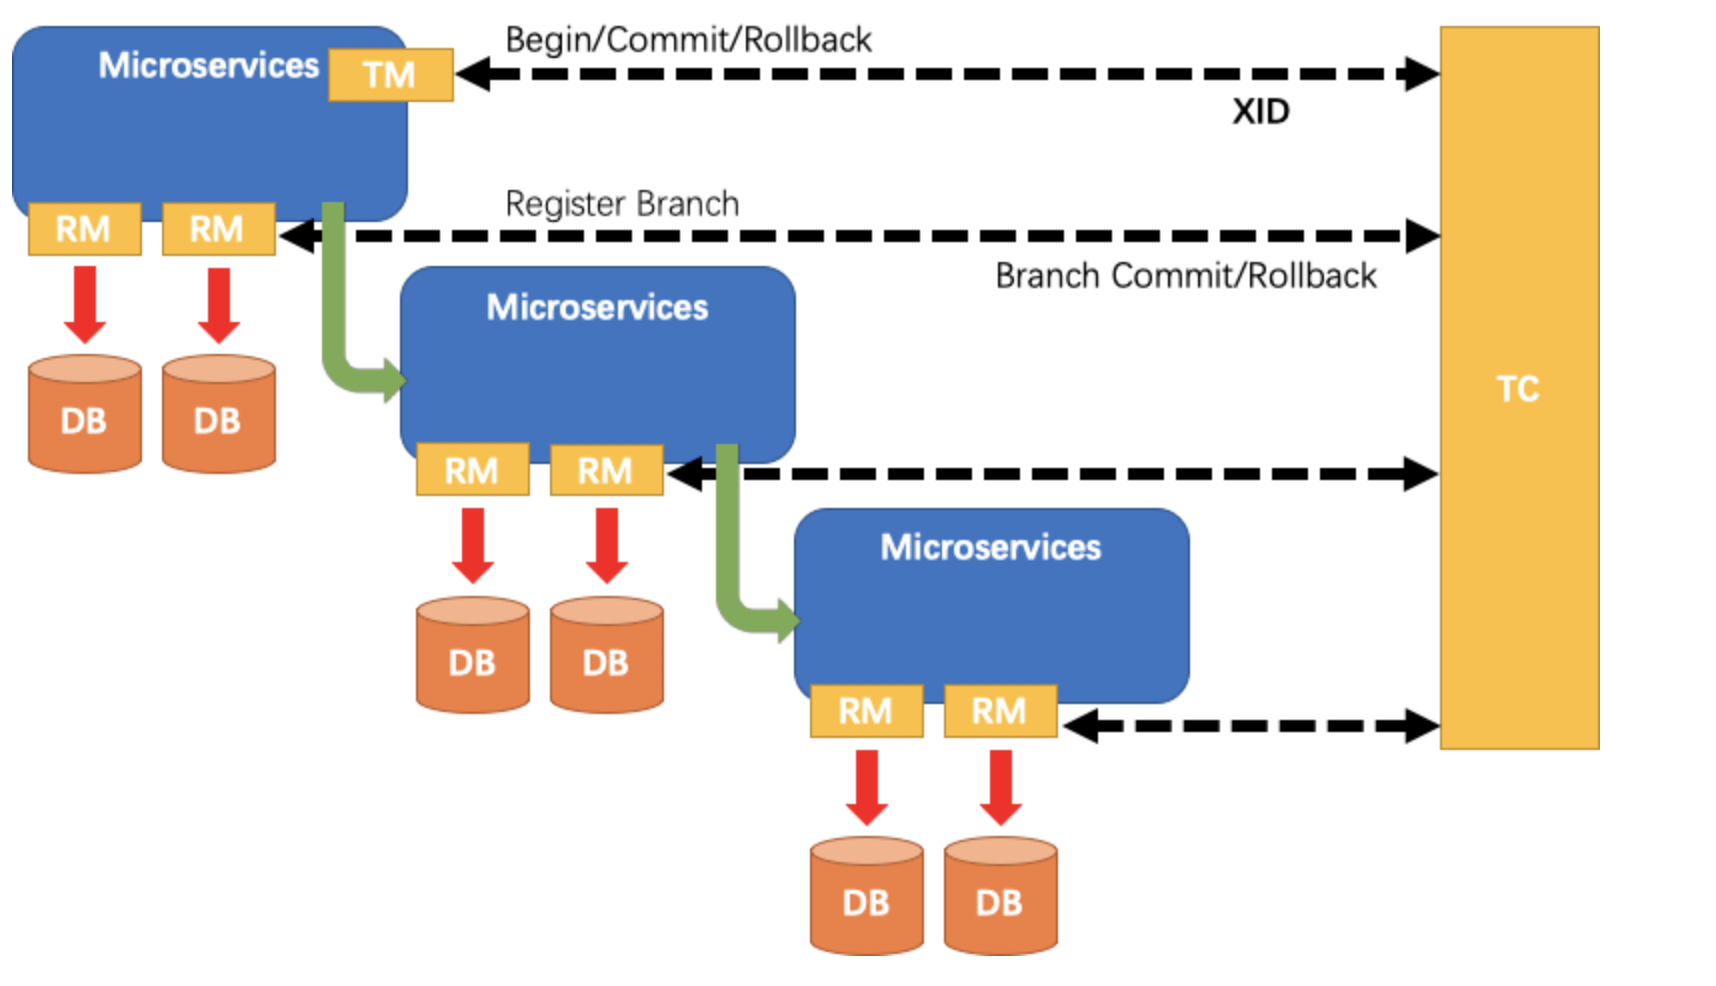
- TM: Transaction initiator. Used to inform TC about the start, commit, and rollback of global transactions.
- RM: Specific transaction resource. Each RM is registered as a branch transaction in TC.
- TC: Transaction coordinator. Also known as Fescar-server, used to receive registration, commit, and rollback of transactions.
In previous articles, I provided a general introduction to the roles, and in this article, I will focus on the core role TC, which is the transaction coordinator.
2. Transaction Coordinator
Why has the emphasis been placed on TC as the core role? Because TC, like God, manages the RM and TM of countless beings in the cloud. If TC fails to function properly, even minor issues with RM and TM will lead to chaos. Therefore, to understand Seata, one must understand its TC.
So, what capabilities should an excellent transaction coordinator possess? I think it should have the following:
- Correct coordination: It should be able to properly coordinate what RM and TM should do next, what to do if something goes wrong, and what to do if everything goes right.
- High availability: The transaction coordinator is crucial in distributed transactions. If it cannot ensure high availability, it serves no purpose.
- High performance: The performance of the transaction coordinator must be high. If there are performance bottlenecks, it will frequently encounter timeouts, leading to frequent rollbacks.
- High scalability: This characteristic belongs to the code level. If it is an excellent framework, it needs to provide many customizable extensions for users, such as service registration/discovery, reading configuration, etc.
Next, I will explain how Seata achieves the above four points.
2.1 Seata-Server Design
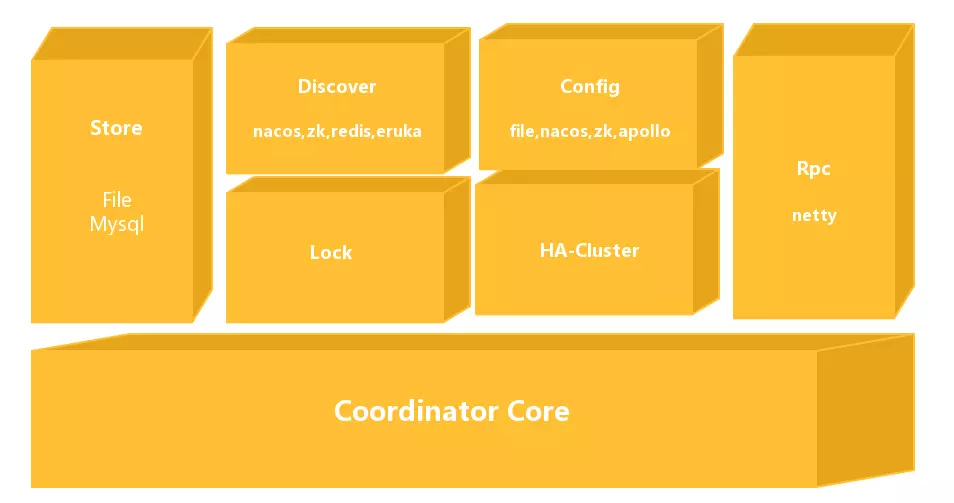
The overall module diagram of Seata-Server is shown above:
- Coordinator Core: At the bottom is the core code of the transaction coordinator, mainly used to handle transaction coordination logic, such as whether to commit, rollback, etc.
- Store: Storage module used to persist data to prevent data loss during restarts or crashes.
- Discovery: Service registration/discovery module used to expose server addresses to clients.
- Config: Used to store and retrieve server configurations.
- Lock: Lock module used to provide global locking functionality to Seata.
- RPC: Used for communication with other endpoints.
- HA-Cluster: High availability cluster, currently not open-source, provides reliable high availability services to Seata, expected to be open-sourced in version 0.6.
2.2 Discovery
First, let's talk about the basic Discovery module, also known as the service registration/discovery module. After starting Seata-Sever, we need to expose our address to other users, which is the responsibility of this module.
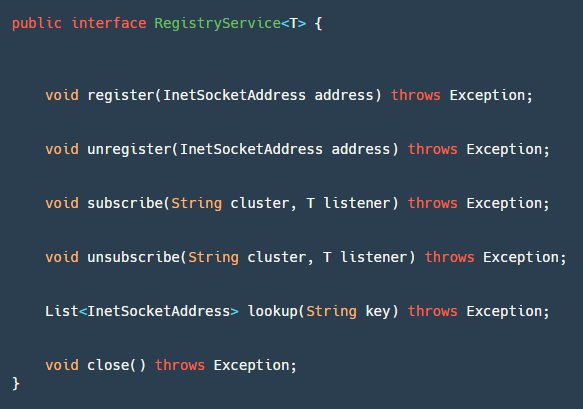
This module has a core interface RegistryService, as shown in the image above:
- register: Used by the server to register the service.
- unregister: Used by the server, typically called in JVM shutdown hooks.
- subscribe: Used by clients to register event listeners to listen for address changes.
- unsubscribe: Used by clients to cancel event listeners.
- lookup: Used by clients to retrieve service address lists based on keys.
- close: Used to close the Registry resource.
If you need to add your own service registration/discovery, just implement this interface. So far, with the continuous development and promotion in the community, there are already five service registration/discovery implementations, including redis, zk, nacos, eruka, and consul. Below is a brief introduction to the Nacos implementation:
2.2.1 register Interface:

Step 1: Validate the address.
Step 2: Get the Naming instance of Nacos and register the address with the service name serverAddr (fixed service name) on the corresponding cluster group (configured in registry.conf).
The unregister interface is similar, and I won't go into detail here.
2.2.2 lookup Interface:
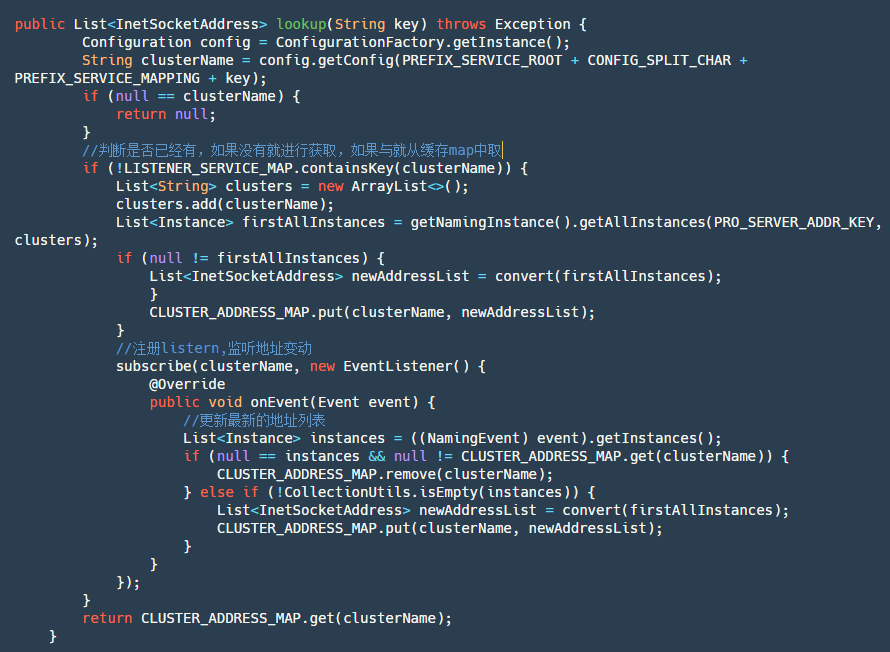
Step 1: Get the current cluster name. Step 2: Check if the service corresponding to the current cluster name has been subscribed. If yes, directly retrieve the subscribed data from the map.
Step 3: If not subscribed, actively query the service instance list once, then add subscription and store the data returned by subscription in the map. After that, retrieve the latest data directly from the map.
2.2.3 subscribe Interface:
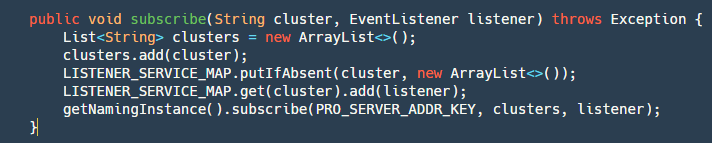
This interface is relatively simple, divided into two steps:
Step 1: Add the cluster -> listener to be subscribed to the map. Since Nacos does not provide a single machine already subscribed list, it needs to be implemented by itself.
Step 2: Subscribe using the Nacos API.
2.3 Config
The configuration module is also a relatively basic and simple module. We need to configure some common parameters such as the number of select and work threads for Netty, the maximum allowed session, etc. Of course, these parameters in Seata have their own default settings.
Similarly, Seata also provides an interface Configuration for customizing where we need to obtain configurations:
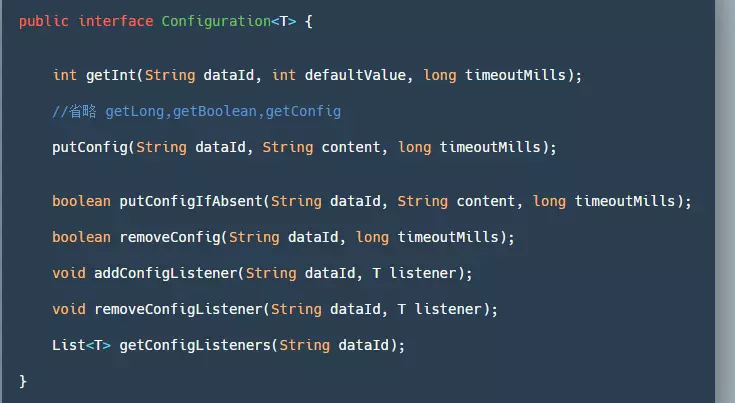
- getInt/Long/Boolean/getConfig(): Retrieves the corresponding value based on the dataId. If the configuration cannot be read, an exception occurs, or a timeout occurs, it returns the default value specified in the parameters.
- putConfig: Used to add configuration.
- removeConfig: Deletes a configuration.
- add/remove/get ConfigListener: Add/remove/get configuration listeners, usually used to listen for configuration changes.
Currently, there are four ways to obtain Config: File (file-based), Nacos, Apollo, and ZK (not recommended). In Seata, you first need to configure registry.conf to specify the config.type. Implementing Config is relatively simple, and I won't delve into it here.
2.4 Store
The implementation of the storage layer is crucial for Seata's performance and reliability. If the storage layer is not implemented well, data being processed by TC in distributed transactions may be lost in the event of a crash. Since distributed transactions cannot tolerate data loss, if the storage layer is implemented well but has significant performance issues, RM may experience frequent rollbacks, making it unable to cope with high-concurrency scenarios.
In Seata, file storage is provided as the default method for storing data. Here, we define the data to be stored as sessions. Sessions created by the TM are referred to as GlobalSessions, while those created by RMs are called BranchSessions. A GlobalSession can have multiple BranchSessions. Our objective is to store all these sessions.
the code of FileTransactionStoreManager:
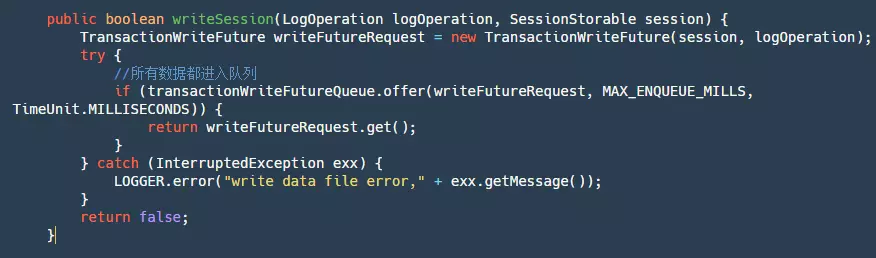
The code snippet above can be broken down into the following steps:
- Step 1: Generate a TransactionWriteFuture.
- Step 2: Put this futureRequest into a LinkedBlockingQueue. Why do we need to put all the data into a queue? Well, in fact, we could also use locks for this purpose. In another Alibaba open-source project, RocketMQ, locks are used. Whether it's a queue or a lock, their purpose is to ensure single-threaded writing. But why is that necessary? Some might explain that it's to ensure sequential writing, which would improve speed. However, this understanding is incorrect. The write method of our FileChannel is thread-safe and already ensures sequential writing. Ensuring single-threaded writing is actually to make our write logic single-threaded. This is because there may be logic such as when a file is full or when records are written to specific positions. Of course, this logic could be actively locked, but to achieve simplicity and convenience, it's most appropriate to queue the entire write logic for processing.
- Step 3: Call future.get to wait for the completion notification of our write logic.
Once we submit the data to the queue, the next step is to consume it. The code is as follows:

Here, a WriteDataFileRunnable() is submitted to our thread pool, and the run() method of this Runnable is as follows:
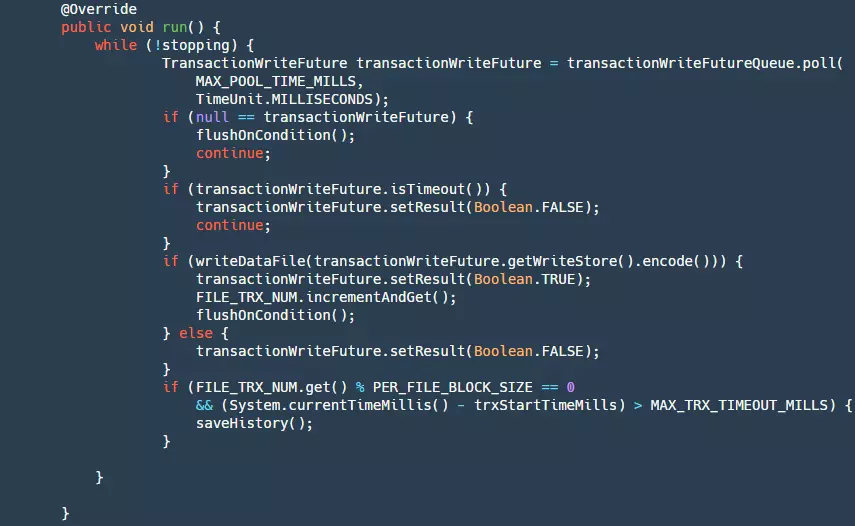
It can be broken down into the following steps:
- Step 1: Check if stopping is true. If so, return null.
- Step 2: Get data from our queue.
- Step 3: Check if the future has timed out. If so, set the result to false. At this point, our producer's get() method will unblock.
- Step 4: Write our data to the file. At this point, the data is still in the pageCache layer and has not been flushed to the disk yet. If the write is successful, flush it based on certain conditions.
- Step 5: When the number of writes reaches a certain threshold, or when the writing time exceeds a certain limit, the current file needs to be saved as a historical file, the old historical files need to be deleted, and a new file needs to be created. This step is to prevent unlimited growth of our files, which would waste disk resources.
In our writeDataFile method, we have the following code:
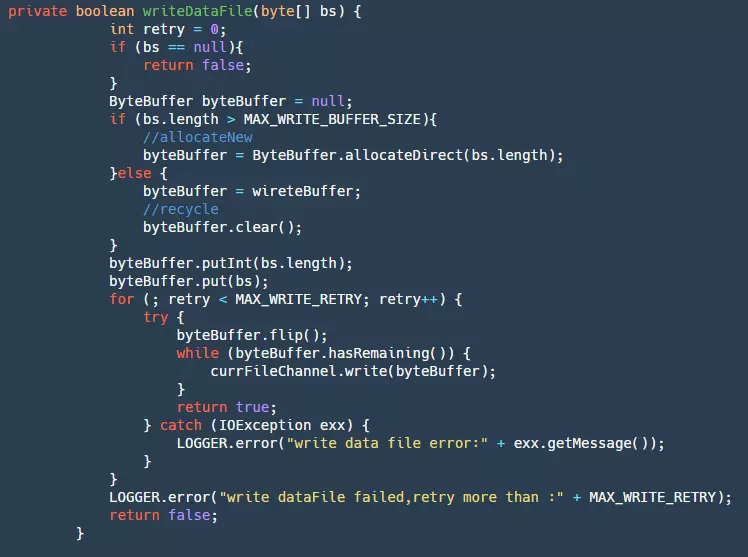
- Step 1: First, get our ByteBuffer. If it exceeds the maximum loop BufferSize, create a new one directly; otherwise, use our cached Buffer. This step can greatly reduce garbage collection.
- Step 2: Add the data to the ByteBuffer.
- Step 3: Finally, write the ByteBuffer to our fileChannel. This will be retried three times. At this point, the data is still in the pageCache layer and is affected by two factors: the OS has its own flushing strategy, but this business program cannot control it. To prevent events such as crashes from causing a large amount of data loss, the business itself needs to control the flush. Below is the flush code:
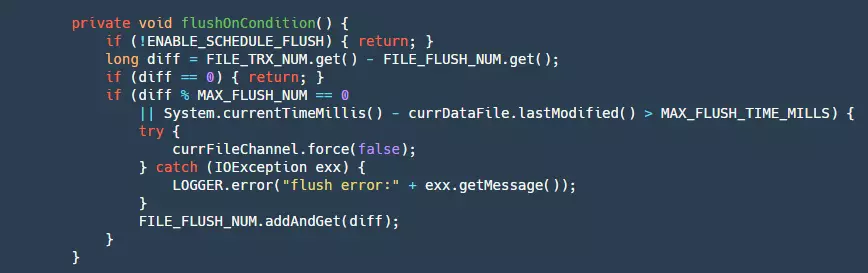
Here, the flush condition is based on writing a certain number of data or exceeding a certain time. This also presents a small issue: in the event of a power failure, there may still be data in the pageCache that has not been flushed to disk, resulting in a small amount of data loss. Currently, synchronous mode is not supported, which means that each piece of data needs to be flushed, ensuring that each message is written to disk. However, this would greatly affect performance. Of course, there will be continuous evolution and support for this in the future.
Our store's core process mainly consists of the above methods, but there are also some other processes such as session reconstruction, which are relatively simple and readers can read them on their own.
2.5 Lock
As we know, the isolation level in databases is mainly implemented through locks. Similarly, in the distributed transaction framework Seata, achieving isolation levels also requires locks. Generally, there are four isolation levels in databases: Read Uncommitted, Read Committed, Repeatable Read, and Serializable. In Seata, it can ensure that the isolation level is Read Committed but provides means to achieve Read Committed isolation.
The Lock module is the core module of Seata for implementing isolation levels. In the Lock module, an interface is provided for managing our locks:
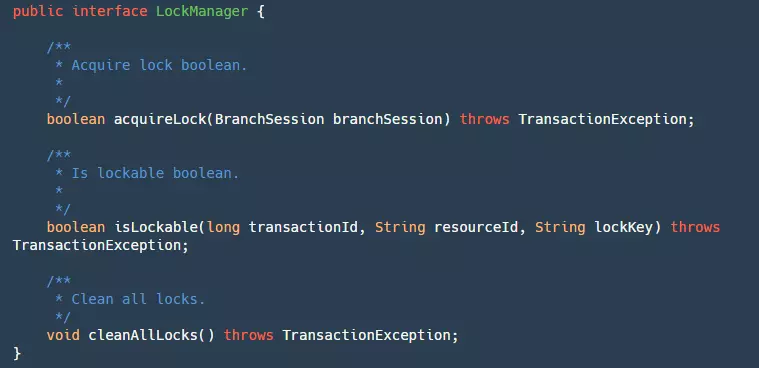
It has three methods:
- acquireLock: Used to lock our BranchSession. Although a branch transaction Session is passed here, it is actually locking the resources of the branch transaction. Returns true upon successful locking.
- isLockable: Queries whether the transaction ID, resource ID, and locked key are already locked.
- cleanAllLocks: Clears all locks.
For locks, we can implement them locally or use Redis or MySQL to help us implement them. The official default provides local global lock implementation:
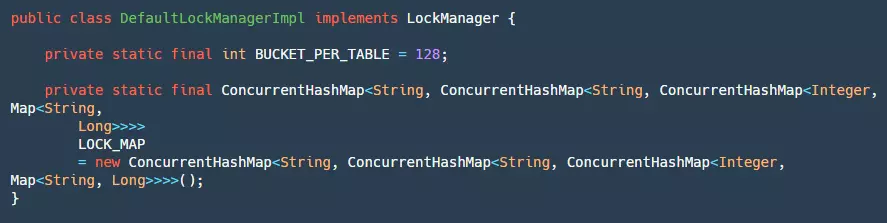
In the local lock implementation, there are two constants to pay attention to:
- BUCKET_PER_TABLE: Defines how many buckets each table has, aiming to reduce competition when locking the same table later.
- LOCK_MAP: This map seems very complex from its definition, with many layers of Maps nested inside and outside. Here's a table to explain it specifically:
| Layer | Key | Value |
|---|---|---|
| 1-LOCK_MAP | resourceId (jdbcUrl) | dbLockMap |
| 2- dbLockMap | tableName (table name) | tableLockMap |
| 3- tableLockMap | PK.hashcode%Bucket (hashcode%bucket of the primary key value) | bucketLockMap |
| 4- bucketLockMap | PK | transactionId |
It can be seen that the actual locking occurs in the bucketLockMap. The specific locking method here is relatively simple and will not be detailed. The main process is to gradually find the bucketLockMap and then insert the current transactionId. If this primary key currently has a TransactionId, then it checks if it is itself; if not, the locking fails.
2.6 RPC
One of the key factors in ensuring Seata's high performance is the use of Netty as the RPC framework, with the default configuration of the thread model as shown in the diagram below:
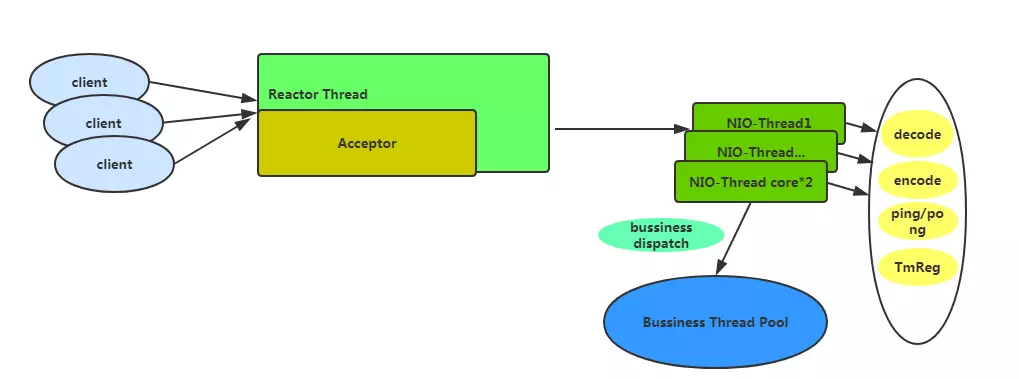
If the default basic configuration is adopted, there will be one Acceptor thread for handling client connections and a number of NIO-Threads equal to cpu*2. In these threads, heavy business operations are not performed. They only handle relatively fast tasks such as encoding and decoding, heartbeats, and TM registration. Time-consuming business operations are delegated to the business thread pool. By default, the business thread pool is configured with a minimum of 100 threads and a maximum of 500.
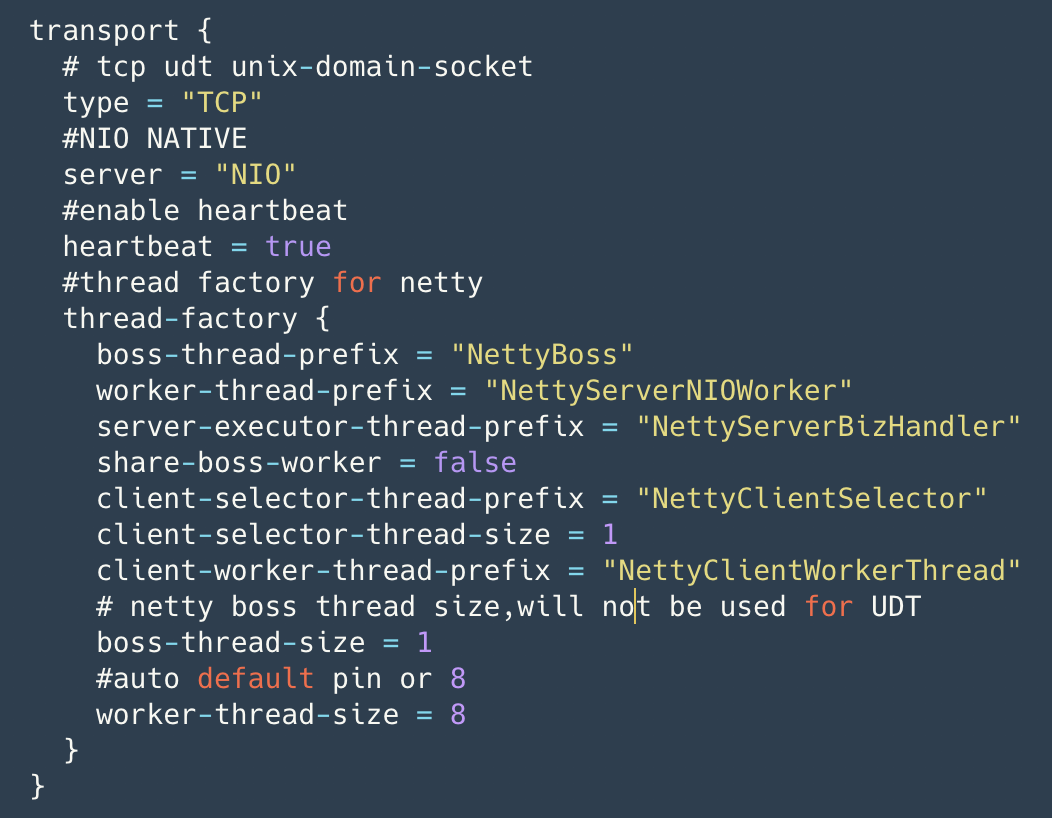
Seata currently allows for configuration of transport layer settings, as shown in the following diagram. Users can optimize Netty transport layer settings according to their needs, and the configuration takes effect when loaded for the first time.
It's worth mentioning Seata's heartbeat mechanism, which is implemented using Netty's IdleStateHandler, as shown below:

On the server side, there is no maximum idle time set for writing, and for reading, the maximum idle time is set to 15 seconds (the client's default write idle time is 5 seconds, sending ping messages). If it exceeds 15 seconds, the connection will be disconnected, and resources will be closed.
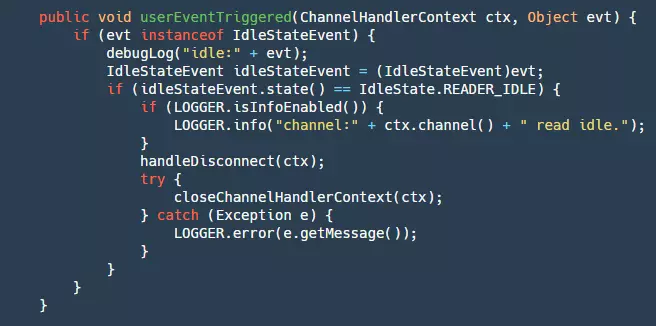
- Step 1: Check if it is a read idle detection event.
- Step 2: If it is, disconnect the connection and close the resources.
Additionally, Seata has implemented features such as memory pools, batch merging of small packets by the client for sending, and Netty connection pools (reducing the service unavailable time when creating connections), one of which is batch merging of small packets.
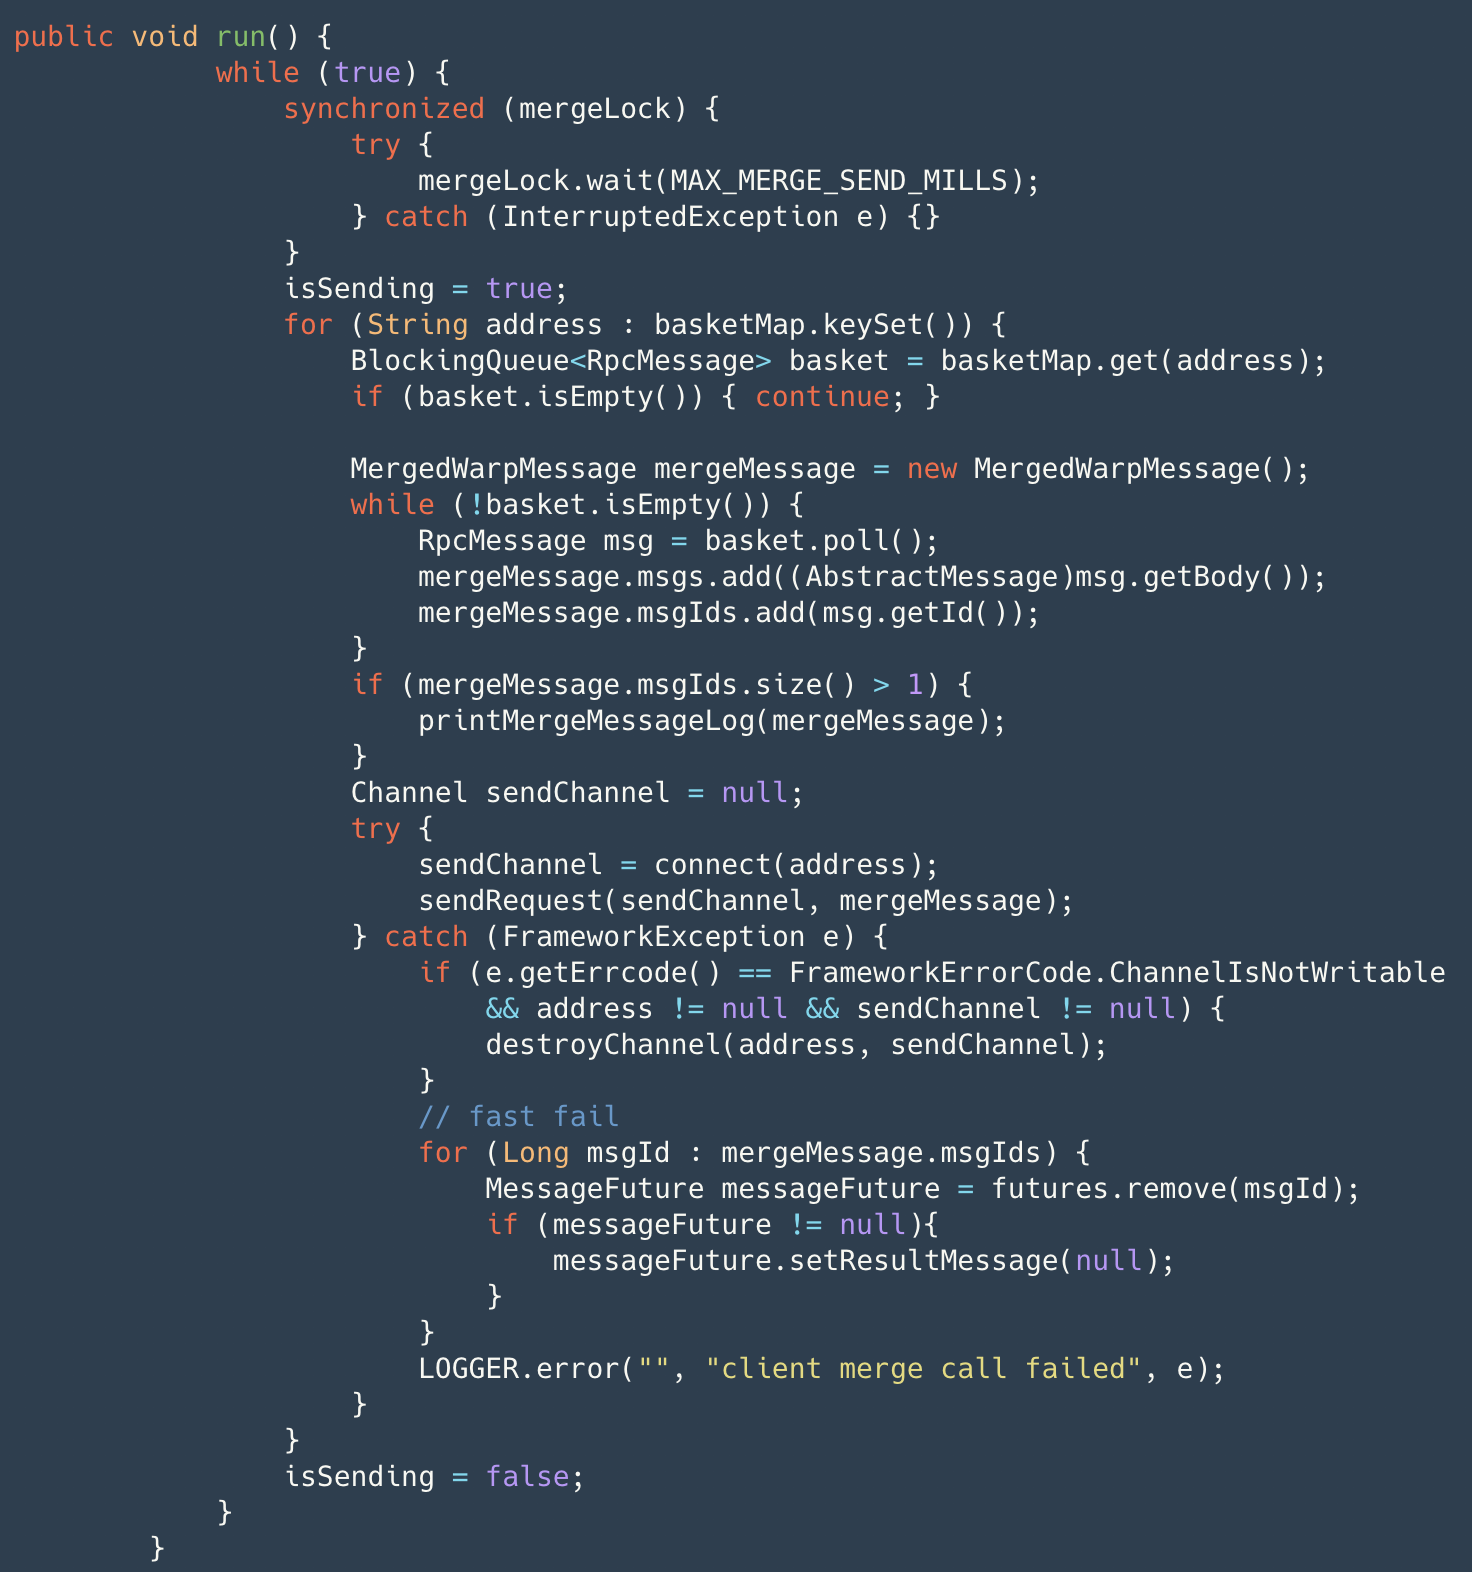
The client's message sending process does not directly send messages. Instead, it wraps the message into an RpcMessage through AbstractRpcRemoting#sendAsyncRequest and stores it in the basket, then wakes up the merge sending thread. The merge sending thread, through a while true loop, waits for a maximum of 1ms to retrieve messages from the basket and wraps them into merge messages for actual sending. If an exception occurs in the channel during this process, it will quickly fail and return the result through fail-fast. Before sending the merge message, it is marked in the map. Upon receiving the results, batch confirmation is performed (AbstractRpcRemotingClient#channelRead), and then dispatched to messageListener and handler for processing. Additionally, timerExecutor periodically checks for timeouts in sent messages, marking them as failed if they exceed the timeout. Specific details of the message protocol design will be provided in subsequent articles, so stay tuned.
Seata's Netty Client consists of TMClient and RMClient, distinguished by their transactional roles. Both inherit from AbstractRpcRemotingClient, which implements RemotingService (service start and stop), RegisterMsgListener (Netty connection pool connection creation callback), and ClientMessageSender (message sending), further inheriting from AbstractRpcRemoting (the top-level message sending and processing template for Client and Server).
The class diagram for RMClient is depicted below:
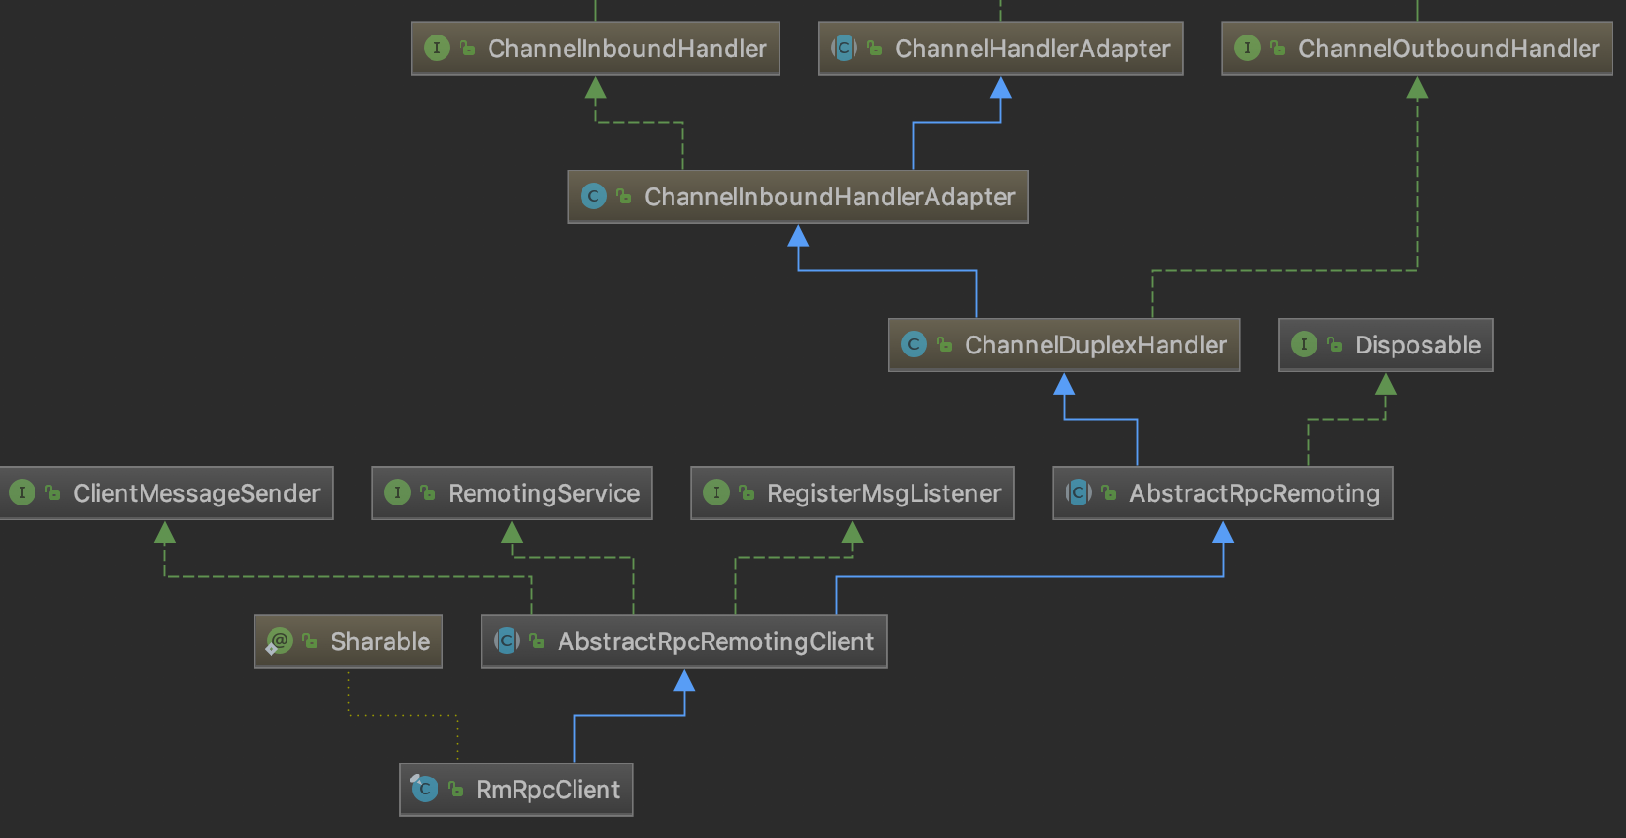
TMClient and RMClient interact with channel connections based on their respective poolConfig and NettyPoolableFactory, which implements KeyedPoolableObjectFactory<NettyPoolKey, Channel>. The channel connection pool locates each connection pool based on the role key+IP, and manages channels uniformly. During the sending process, TMClient and RMClient each use only one long-lived connection per IP. However, if a connection becomes unavailable, it is quickly retrieved from the connection pool, reducing service downtime.
2.7 HA-Cluster
Currently, the official HA-Cluster design has not been publicly disclosed. However, based on some hints from other middleware and the official channels, HA-Cluster could be designed as follows:
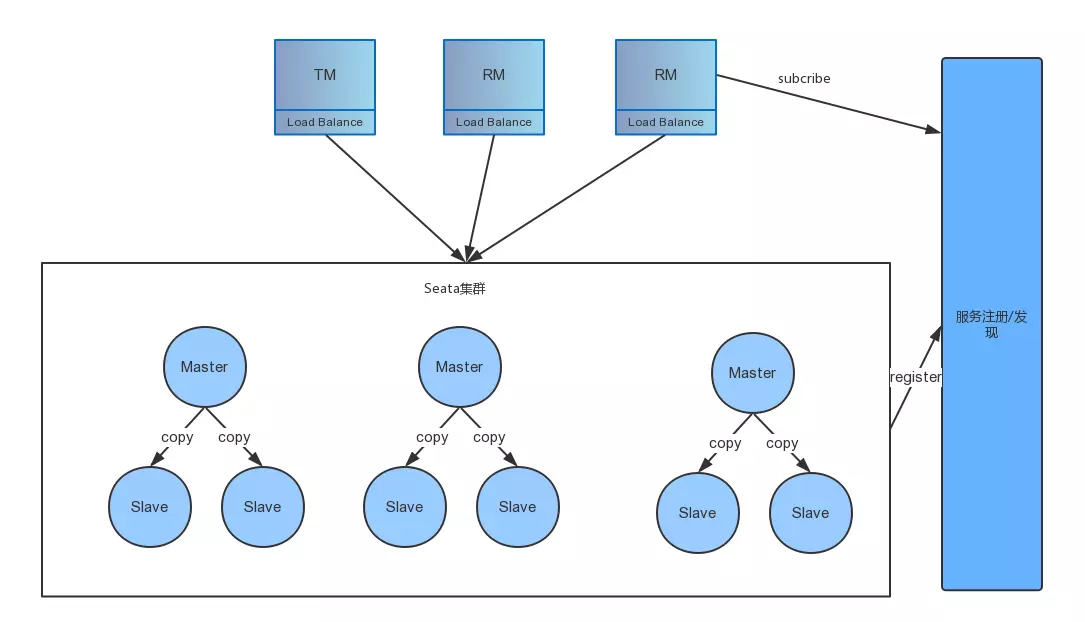
The specific process is as follows:
Step 1: When clients publish information, they ensure that the same transaction with the same transaction ID is handled on the same master. This is achieved by horizontally scaling multiple masters to provide concurrent processing performance.
Step 2: On the server side, each master has multiple slaves. Data in the master is nearly real-time synchronized to the slaves, ensuring that when the master crashes, other slaves can take over.
However, all of the above is speculation, and the actual design and implementation will have to wait until version 0.5. Currently, there is a Go version of Seata-Server donated to Seata (still in progress), which implements replica consistency through Raft. However, other details are not clear.
2.8 Metrics
This module has not yet disclosed a specific implementation. However, it may provide a plugin interface for integrating with other third-party metrics. Recently, Apache SkyWalking has been discussing how to integrate with the Seata team.
3. Coordinator Core
We have covered many foundational modules of the Seata server. I believe you now have a general understanding of Seata's implementation. Next, I will explain how the transaction coordinator's specific logic is implemented, providing you with a deeper understanding of Seata's internal workings.
3.1 Startup Process
The startup method is defined in the Server class's main method, outlining our startup process:
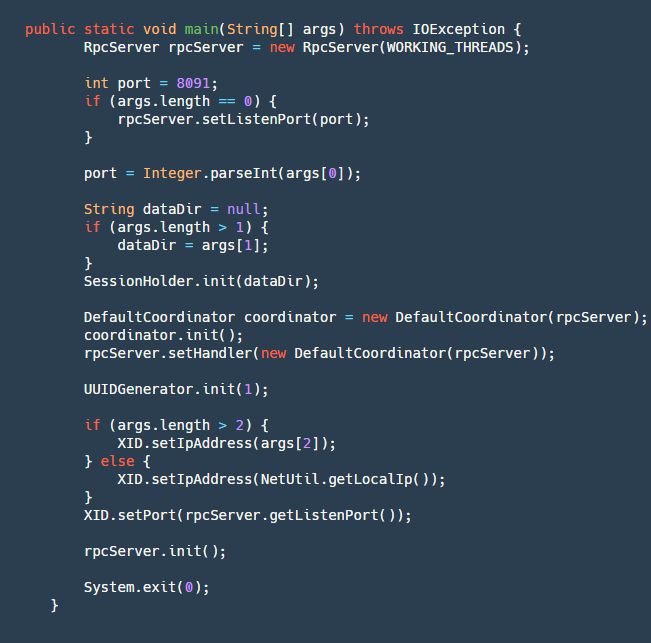
step1: Create an RpcServer, which encapsulates network operations using Netty to implement the server.
step2: Parse the port number, local file address (for recovering incomplete transactions if the server crashes), and IP address (optional, useful for obtaining an external VIP registration service when crossing networks).
step3: Initialize SessionHolder, wherein the crucial step is to recover data from the dataDir folder and rebuild sessions.
step4: Create a Coordinator, the core logic of the transaction coordinator, and initialize it. The initialization process includes creating four scheduled tasks:
- retryRollbacking: Retry rollback task, used to retry failed rollbacks, executed every 5ms.
- retryCommitting: Retry commit task, used to retry failed commits, executed every 5ms.
- asyncCommitting: Asynchronous commit task, used to perform asynchronous commits, executed every 10ms.
- timeoutCheck: Timeout task check, used to detect timeout tasks and execute timeout logic, executed every 2ms.
step5: Initialize UUIDGenerator, a basic class used for generating various IDs (transactionId, branchId).
step6: Set the local IP and listening port in XID, initialize rpcServer, and wait for client connections.
The startup process is relatively straightforward. Next, I will describe how Seata handles common business logic in distributed transaction frameworks.
3.2 Begin - Start Global Transaction
The starting point of a distributed transaction is always to start a global transaction. Let's see how Seata implements global transactions:

step1: Create a GloabSession based on the application ID, transaction group, name, and timeout. As mentioned earlier, GloabSession and BranchSession represent different aspects of the transaction.
step2: Add a RootSessionManager to it for listening to some events. Currently, Seata has four types of listeners (it's worth noting that all session managers implement SessionLifecycleListener):
- ROOT_SESSION_MANAGER: The largest, containing all sessions.
- ASYNC_COMMITTING_SESSION_MANAGER: Manages sessions that need asynchronous commit.
- RETRY_COMMITTING_SESSION_MANAGER: Manages sessions for retrying commit.
- RETRY_ROLLBACKING_SESSION_MANAGER: Manages sessions for retrying rollback. Since this is the beginning of a transaction, other SessionManagers are not needed, so only add RootSessionManager.
step3: Start GloabSession, which changes the state to Begin, records the start time, and calls the onBegin method of RootSessionManager to save the session to the map and write it to the file.
step4: Finally, return the XID. This XID is composed of ip+port+transactionId, which is crucial. When the TM acquires it, it needs to pass this ID to RM. RM uses XID to determine which server to access.
3.3 BranchRegister - Register Branch Transaction
After the global transaction is initiated by TM, the branch transaction of our RM also needs to be registered on top of our global transaction. Here's how it's handled:
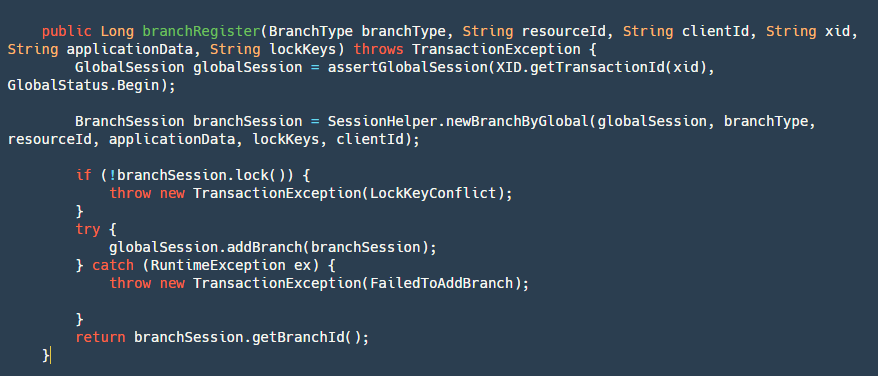
step1: Retrieve and validate the global transaction's state based on the transactionId.
step2: Create a new branch transaction, which is our BranchSession.
step3: Lock the branch transaction globally. Here, the logic uses the lock module.
step4: Add the branchSession, mainly by adding it to the globalSession object and writing it to our file.
step5: Return the branchId, which is also important. We will need it later to roll back our transaction or update the status of our branch transaction.
After registering the branch transaction, it is necessary to report whether the local transaction execution of the branch transaction was successful or failed. Currently, the server simply records this information. The purpose of reporting is that even if this branch transaction fails, if the TM insists on committing the global transaction (catches exceptions without throwing), then when traversing to commit the branch transaction, this failed branch transaction does not need to be committed (users can choose to skip it).
3.4 GlobalCommit - Global Commit
When our branch transaction is completed, it's up to our TM - Transaction Manager to decide whether to commit or rollback. If it's a commit, then the following logic will be executed:
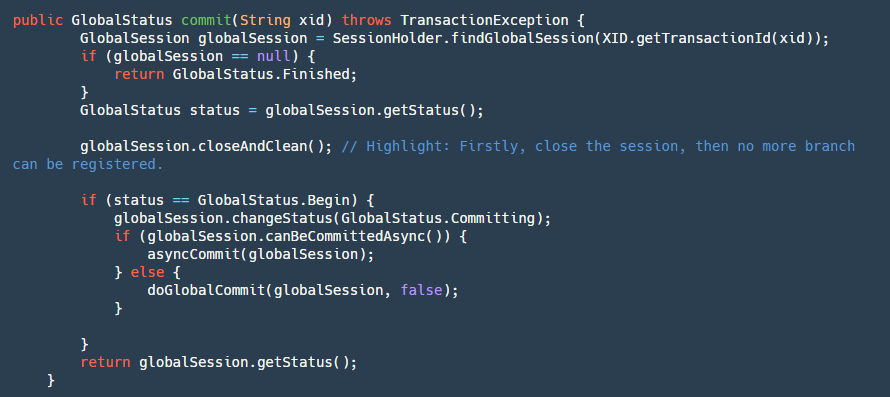
step1: First, find our globalSession. If it's null, it means it has already been committed, so perform idempotent operation and return success.
step2: Close our GloabSession to prevent new branches from coming in (rollback due to timeout in cross-service calls, provider continues execution).
step3: If the status is Begin, it means it hasn't been committed yet, so change its status to Committing, indicating that it's committing.
step4: Determine if it can be asynchronously committed. Currently, only AT mode can be asynchronously committed. In two-phase global commits, undolog is only deleted without strict order. Here, a timer task is used, and the client merges and deletes in batches after receiving it.
step5: If it's an asynchronous commit, directly put it into our ASYNC_COMMITTING_SESSION_MANAGER to let it asynchronously execute step6 in the background. If it's synchronous, then execute step6 directly.
step6: Traverse our BranchSessions for submission. If a branch transaction fails, determine whether to retry based on different conditions. This branchSession can be executed asynchronously, and if it fails, it can continue with the next one because it remains in the manager and won't be deleted until it succeeds. If it's a synchronous commit, it will be put into the retry queue for scheduled retries and will block and submit in sequence.
3.5 GlobalRollback - Global Rollback
If our TM decides to globally rollback, it will follow the logic below:
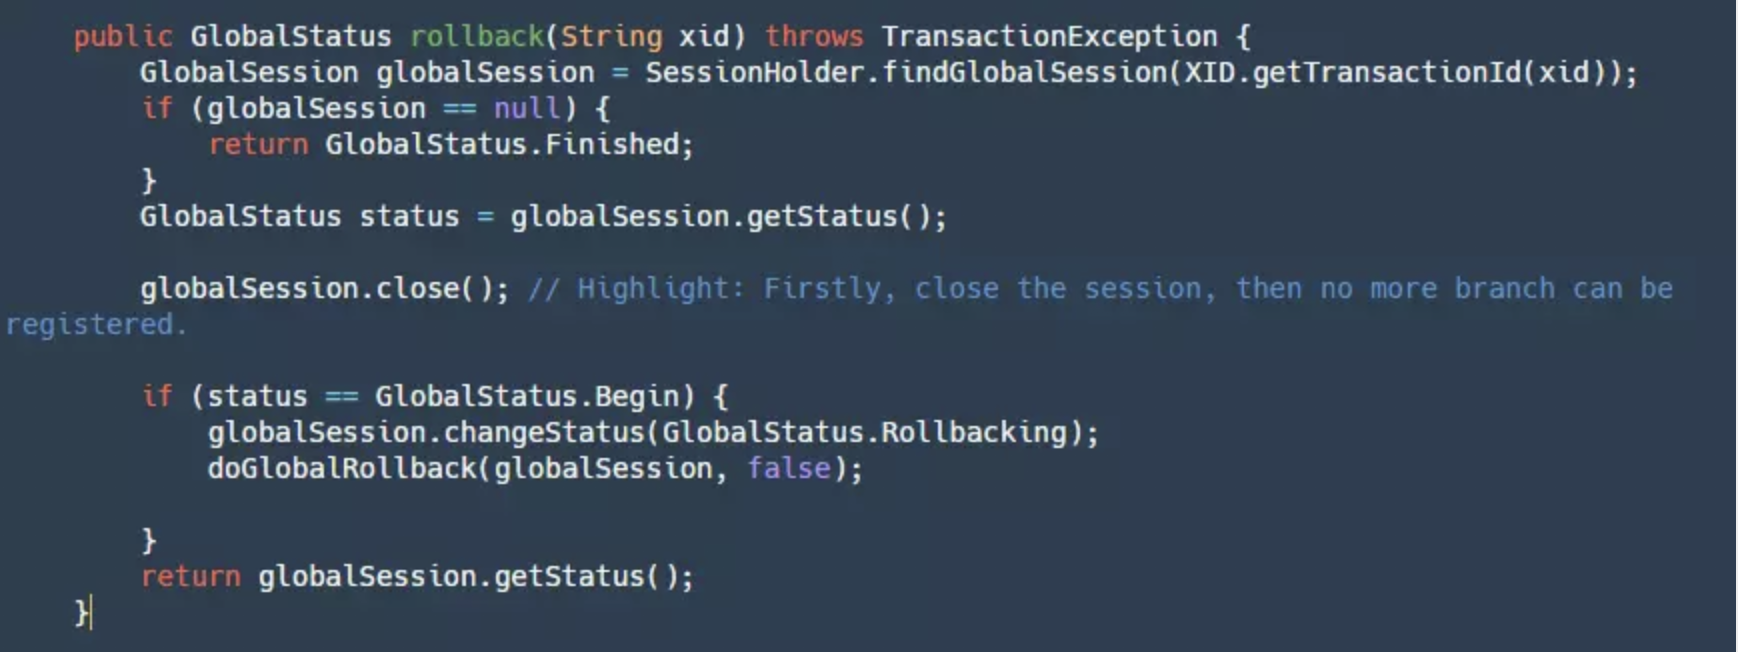
This logic is basically the same as the commit process but in reverse. I won't delve into it here.
4. Conclusion
Finally, let's summarize how Seata solves the key points of distributed transactions:
- Correct coordination: Through background scheduled tasks, various retries are performed correctly, and in the future, a monitoring platform may be introduced, possibly allowing manual rollback.
- High availability: Ensured by HA-Cluster.
- High performance: Sequential file writing, RPC implemented through Netty, and Seata can be horizontally scaled in the future to improve processing performance.
- High extensibility: Provides places where users can freely implement, such as configuration, service discovery and registration, global lock, etc.
In conclusion, I hope you can understand the core design principles of Seata-Server from this article. Of course, you can also imagine how you would design a distributed transaction server if you were to implement one yourself.
Seata GitHub Repository: https://github.com/apache/incubator-seata
Article Authors:
Li Zhao, GitHub ID @CoffeeLatte007, author of the public account "咖啡拿铁", Seata community Committer, Java engineer at Yuanfudao, formerly employed at Meituan. Has a strong interest in distributed middleware and distributed systems. Ji Min (Qingming), GitHub ID @slievrly, Seata open source project leader, core R&D member of Alibaba middleware TXC/GTS, has long been engaged in core R&D work of distributed middleware, and has rich technical accumulation in the field of distributed transactions.