本文作者:FUNKYE(陈健斌),杭州某互联网公司主程。
前言
事务:事务是由一组操作构成的可靠的独立的工作单元,事务具备ACID的特性,即原子性、一致性、隔离性和持久性。 分布式事务:当一个操作牵涉到多个服务,多台数据库协力完成时(比如分表分库后,业务拆分),多个服务中,本地的Transaction已经无法应对这个情况了,为了保证数据一致性,就需要用到分布式事务。 Seata :是一款开源的分布式事务解决方案,致力于在微服务架构下提供高性能和简单易用的分布式事务服务。 本文目的:现如今微服务越来越流行,而市面上的分布式事务的方案可谓不少,参差不齐,比较流行的以MQ代表的保证的是消息最终一致性的解决方案(消费确认,消息回查,消息补偿机制等),以及TX-LCN的LCN模式协调本地事务来保证事务统一提交或回滚(已经停止更新,对Dubbo2.7不兼容)。而MQ的分布式事务太过复杂,TX-LCN断更,这时候需要一个高效可靠及易上手的分布式事务解决方案,Seata脱颖而出,本文要介绍的就是如何快速搭建一个整合Seata的Demo项目,一起来吧!
准备工作
1.首先安装mysql,eclipse之类常用的工具,这不展开了.
2.访问seata下载中心地址我们使用的0.9.0版本
3.下载并解压seata-server
建库建表
1.首先我们链接mysql创建一个名为seata的数据库,然后运行一下建表sql,这个在seata-server的conf文件夹内的db_store.sql就是我的所需要使用的sql了.
/*
Navicat MySQL Data Transfer
Source Server         : mysql
Source Server Version : 50721
Source Host           : localhost:3306
Source Database       : seata
Target Server Type    : MYSQL
Target Server Version : 50721
File Encoding         : 65001
Date: 2019-11-23 22:03:18
*/

SET FOREIGN_KEY_CHECKS=0;

-- ----------------------------

-- Table structure for branch_table

-- ----------------------------

DROP TABLE IF EXISTS `branch_table`;
CREATE TABLE `branch_table` (
  `branch_id` bigint(20) NOT NULL,
  `xid` varchar(128) NOT NULL,
  `transaction_id` bigint(20) DEFAULT NULL,
  `resource_group_id` varchar(32) DEFAULT NULL,
  `resource_id` varchar(256) DEFAULT NULL,
  `lock_key` varchar(128) DEFAULT NULL,
  `branch_type` varchar(8) DEFAULT NULL,
  `status` tinyint(4) DEFAULT NULL,
  `client_id` varchar(64) DEFAULT NULL,
  `application_data` varchar(2000) DEFAULT NULL,
  `gmt_create` datetime DEFAULT NULL,
  `gmt_modified` datetime DEFAULT NULL,
  PRIMARY KEY (`branch_id`),
  KEY `idx_xid` (`xid`)
) ENGINE=InnoDB DEFAULT CHARSET=utf8mb4;

-- ----------------------------

-- Records of branch_table

-- ----------------------------

-- ----------------------------

-- Table structure for global_table

-- ----------------------------

DROP TABLE IF EXISTS `global_table`;
CREATE TABLE `global_table` (
  `xid` varchar(128) NOT NULL,
  `transaction_id` bigint(20) DEFAULT NULL,
  `status` tinyint(4) NOT NULL,
  `application_id` varchar(32) DEFAULT NULL,
  `transaction_service_group` varchar(32) DEFAULT NULL,
  `transaction_name` varchar(128) DEFAULT NULL,
  `timeout` int(11) DEFAULT NULL,
  `begin_time` bigint(20) DEFAULT NULL,
  `application_data` varchar(2000) DEFAULT NULL,
  `gmt_create` datetime DEFAULT NULL,
  `gmt_modified` datetime DEFAULT NULL,
  PRIMARY KEY (`xid`),
  KEY `idx_gmt_modified_status` (`gmt_modified`,`status`),
  KEY `idx_transaction_id` (`transaction_id`)
) ENGINE=InnoDB DEFAULT CHARSET=utf8mb4;

-- ----------------------------

-- Records of global_table

-- ----------------------------

-- ----------------------------

-- Table structure for lock_table

-- ----------------------------

DROP TABLE IF EXISTS `lock_table`;
CREATE TABLE `lock_table` (
  `row_key` varchar(128) NOT NULL,
  `xid` varchar(96) DEFAULT NULL,
  `transaction_id` mediumtext,
  `branch_id` mediumtext,
  `resource_id` varchar(256) DEFAULT NULL,
  `table_name` varchar(32) DEFAULT NULL,
  `pk` varchar(36) DEFAULT NULL,
  `gmt_create` datetime DEFAULT NULL,
  `gmt_modified` datetime DEFAULT NULL,
  PRIMARY KEY (`row_key`)
) ENGINE=InnoDB DEFAULT CHARSET=utf8mb4;

-- ----------------------------

-- Records of lock_table

-- ----------------------------

-- ----------------------------

-- Table structure for undo_log

-- ----------------------------

DROP TABLE IF EXISTS `undo_log`;
CREATE TABLE `undo_log` (
  `id` bigint(20) NOT NULL AUTO_INCREMENT,
  `branch_id` bigint(20) NOT NULL,
  `xid` varchar(100) NOT NULL,
  `context` varchar(128) NOT NULL,
  `rollback_info` longblob NOT NULL,
  `log_status` int(11) NOT NULL,
  `log_created` datetime NOT NULL,
  `log_modified` datetime NOT NULL,
  `ext` varchar(100) DEFAULT NULL,
  PRIMARY KEY (`id`),
  UNIQUE KEY `ux_undo_log` (`xid`,`branch_id`)
) ENGINE=InnoDB DEFAULT CHARSET=utf8;

-- ----------------------------

-- Records of undo_log
2.运行完上面的seata所需要的数据库后,我们进行搭建我们所需要写的demo的库,创建一个名为test的数据库,然后执行以下sql代码:
/*
Navicat MySQL Data Transfer
Source Server         : mysql
Source Server Version : 50721
Source Host           : localhost:3306
Source Database       : test
Target Server Type    : MYSQL
Target Server Version : 50721
File Encoding         : 65001
Date: 2019-11-23 22:03:24
*/

SET FOREIGN_KEY_CHECKS=0;

-- ----------------------------

-- Table structure for test

-- ----------------------------

DROP TABLE IF EXISTS `test`;
CREATE TABLE `test` (
  `id` int(11) NOT NULL AUTO_INCREMENT,
  `one` varchar(255) DEFAULT NULL,
  `two` varchar(255) DEFAULT NULL,
  `createTime` datetime DEFAULT NULL,
  PRIMARY KEY (`id`)
) ENGINE=InnoDB AUTO_INCREMENT=4 DEFAULT CHARSET=utf8mb4;

-- ----------------------------

-- Records of test

-- ----------------------------

INSERT INTO `test` VALUES ('1', '1', '2', '2019-11-23 16:07:34');

-- ----------------------------

-- Table structure for undo_log

-- ----------------------------

DROP TABLE IF EXISTS `undo_log`;
CREATE TABLE `undo_log` (
  `id` bigint(20) NOT NULL AUTO_INCREMENT,
  `branch_id` bigint(20) NOT NULL,
  `xid` varchar(100) NOT NULL,
  `context` varchar(128) NOT NULL,
  `rollback_info` longblob NOT NULL,
  `log_status` int(11) NOT NULL,
  `log_created` datetime NOT NULL,
  `log_modified` datetime NOT NULL,
  `ext` varchar(100) DEFAULT NULL,
  PRIMARY KEY (`id`),
  UNIQUE KEY `ux_undo_log` (`xid`,`branch_id`)
) ENGINE=InnoDB AUTO_INCREMENT=3 DEFAULT CHARSET=utf8;

-- ----------------------------

-- Records of undo_log
3.我们找到seata-server/conf 文件夹内的file编辑它: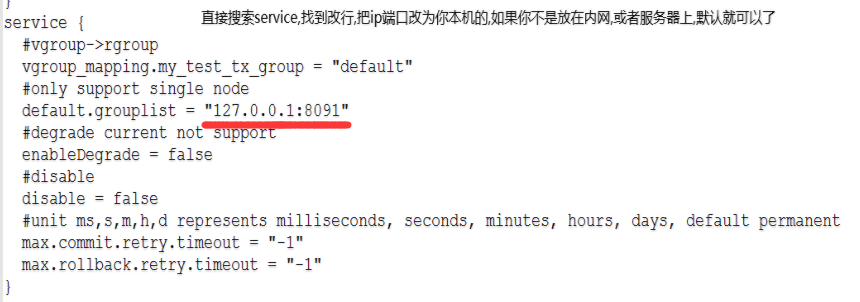
4.再次找到其中的db配置方法块,更改方法如下图: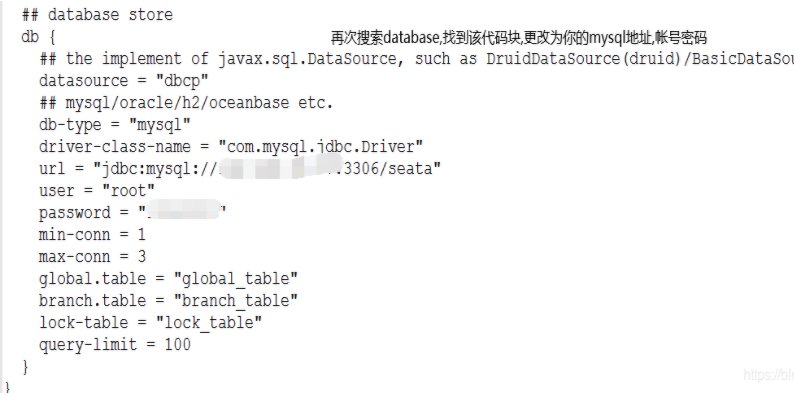
好了,可以到bin目录去./seata-server.bat 运行看看了
创建项目
首先我们使用的是eclipse,当然你也可以用idea之类的工具,详细请按下面步骤来运行
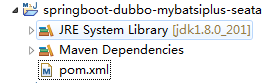
1.创建一个新的maven项目,并删除多余文件夹: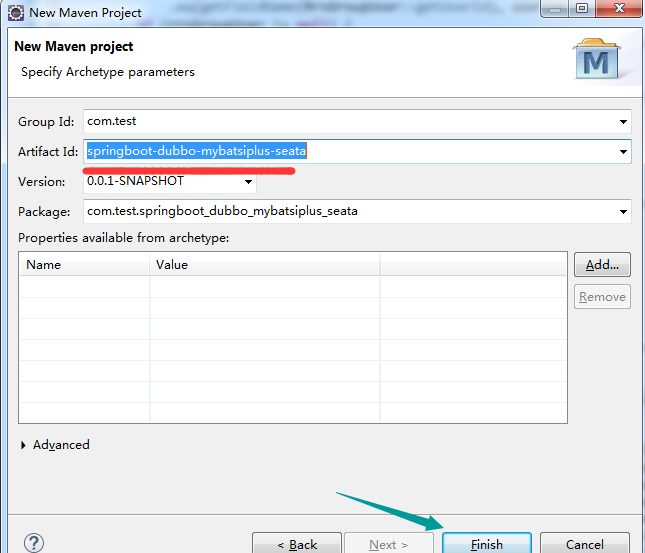
2.打开项目的pom.xml,加入以下依赖:
	<properties>
		<webVersion>3.1</webVersion>
		<project.build.sourceEncoding>UTF-8</project.build.sourceEncoding>
		<project.reporting.outputEncoding>UTF-8</project.reporting.outputEncoding>
		<maven.compiler.source>1.8</maven.compiler.source>
		<maven.compiler.target>1.8</maven.compiler.target>
		<HikariCP.version>3.2.0</HikariCP.version>
		<mybatis-plus-boot-starter.version>3.2.0</mybatis-plus-boot-starter.version>
	</properties>
	<parent>
		<groupId>org.springframework.boot</groupId>
		<artifactId>spring-boot-starter-parent</artifactId>
		<version>2.1.8.RELEASE</version>
	</parent>
	<dependencies>
		<dependency>
			<groupId>org.apache.curator</groupId>
			<artifactId>curator-framework</artifactId>
			<version>4.2.0</version>
		</dependency>
		<dependency>
			<groupId>org.apache.curator</groupId>
			<artifactId>curator-recipes</artifactId>
			<version>4.2.0</version>
		</dependency>
		<dependency>
			<groupId>org.apache.dubbo</groupId>
			<artifactId>dubbo-spring-boot-starter</artifactId>
			<version>2.7.4.1</version>
		</dependency>
		<dependency>
			<groupId>org.apache.commons</groupId>
			<artifactId>commons-lang3</artifactId>
			</dependency>
		<dependency>
			<groupId>com.alibaba</groupId>
			<artifactId>fastjson</artifactId>
			<version>1.2.60</version>
		</dependency>
		<!-- <dependency> <groupId>javax</groupId> <artifactId>javaee-api</artifactId>
			<version>7.0</version> <scope>provided</scope> </dependency> -->
		<dependency>
			<groupId>io.springfox</groupId>
			<artifactId>springfox-swagger2</artifactId>
			<version>2.9.2</version>
		</dependency>
		<dependency>
			<groupId>io.springfox</groupId>
			<artifactId>springfox-swagger-ui</artifactId>
			<version>2.9.2</version>
		</dependency>

		<!-- mybatis-plus begin -->
		<dependency>
			<groupId>com.baomidou</groupId>
			<artifactId>mybatis-plus-boot-starter</artifactId>
			<version>${mybatis-plus-boot-starter.version}</version>
		</dependency>
		<!-- mybatis-plus end -->
		<!-- https://mvnrepository.com/artifact/org.projectlombok/lombok -->
		<dependency>
			<groupId>org.projectlombok</groupId>
			<artifactId>lombok</artifactId>
			<scope>provided</scope>
		</dependency>
		<dependency>
			<groupId>io.seata</groupId>
			<artifactId>seata-all</artifactId>
			<version>0.9.0.1</version>
		</dependency>
		<!-- Zookeeper -->
		<dependency>
			<groupId>org.apache.zookeeper</groupId>
			<artifactId>zookeeper</artifactId>
			<version>3.4.9</version>
			<exclusions>
				<exclusion>
					<groupId>org.slf4j</groupId>
					<artifactId>slf4j-log4j12</artifactId>
				</exclusion>
			</exclusions>
		</dependency>
		<!-- <dependency> <groupId>com.baomidou</groupId> <artifactId>dynamic-datasource-spring-boot-starter</artifactId>
			<version>2.5.4</version> </dependency> -->

		<!-- <dependency> <groupId>com.baomidou</groupId> <artifactId>mybatis-plus-generator</artifactId>
			<version>3.1.0</version> </dependency> -->
		<!-- https://mvnrepository.com/artifact/org.freemarker/freemarker -->
		<dependency>
			<groupId>org.freemarker</groupId>
			<artifactId>freemarker</artifactId>
		</dependency>
		<!-- https://mvnrepository.com/artifact/com.alibaba/druid-spring-boot-starter -->
		<dependency>
			<groupId>com.alibaba</groupId>
			<artifactId>druid-spring-boot-starter</artifactId>
			<version>1.1.20</version>
		</dependency>
		<!-- 加上这个才能辨认到log4j2.yml文件 -->
		<dependency>
			<groupId>com.fasterxml.jackson.dataformat</groupId>
			<artifactId>jackson-dataformat-yaml</artifactId>
		</dependency>
		<dependency> <!-- 引入log4j2依赖 -->
			<groupId>org.springframework.boot</groupId>
			<artifactId>spring-boot-starter-log4j2</artifactId>
		</dependency>
		<!-- https://mvnrepository.com/artifact/mysql/mysql-connector-java -->
		<dependency>
			<groupId>mysql</groupId>
			<artifactId>mysql-connector-java</artifactId>
		</dependency>
		<dependency>
			<groupId>org.springframework.boot</groupId>
			<artifactId>spring-boot-starter-web</artifactId>
			<exclusions>
				<exclusion>
					<groupId>org.springframework.boot</groupId>
					<artifactId>spring-boot-starter-logging</artifactId>
				</exclusion>
				<exclusion>
					<groupId>org.slf4j</groupId>
					<artifactId>slf4j-log4j12</artifactId>
				</exclusion>
			</exclusions>
		</dependency>
		<dependency>
			<groupId>org.springframework.boot</groupId>
			<artifactId>spring-boot-starter-aop</artifactId>
		</dependency>
		<dependency>
			<groupId>org.springframework.boot</groupId>
			<artifactId>spring-boot-starter-test</artifactId>
			<scope>test</scope>
		</dependency>
		<!-- <dependency> <groupId>org.scala-lang</groupId> <artifactId>scala-library</artifactId>
			<version>2.11.0</version> </dependency> -->
		<dependency>
			<groupId>org.springframework.boot</groupId>
			<artifactId>spring-boot-configuration-processor</artifactId>
			<optional>true</optional>
		</dependency>
	</dependencies>
3.再切换父项目为pom模式,还是pom文件,切换为 overview ,做如图操作: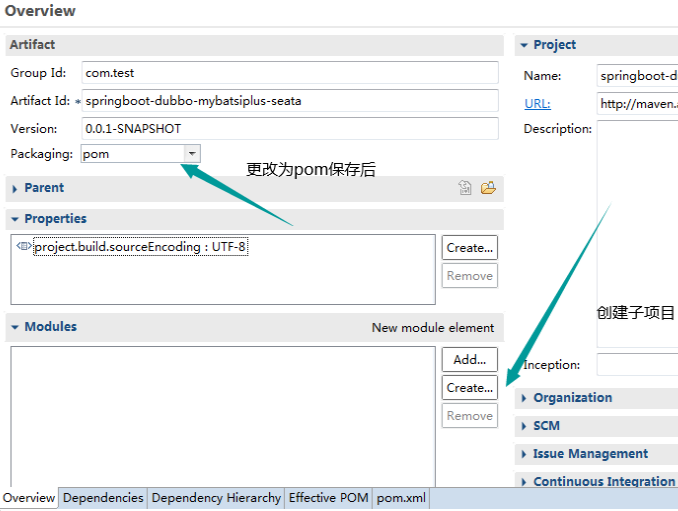
4.创建我们的demo子项目,test-service: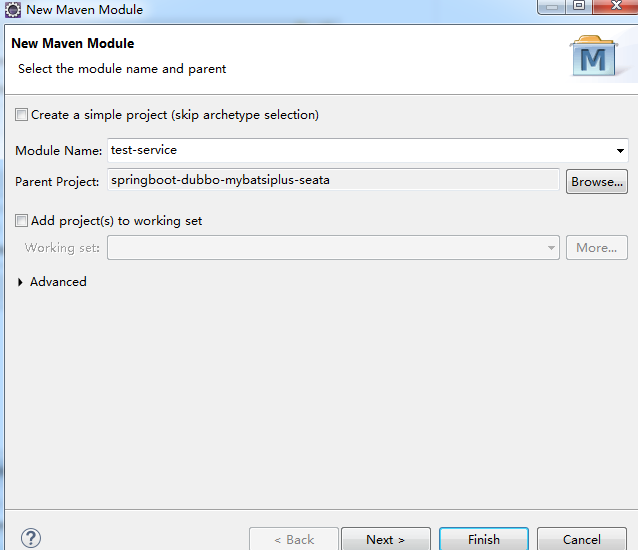
目录如下:
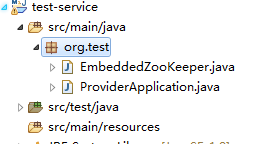
创建EmbeddedZooKeeper.java文件,跟 ProviderApplication.java,代码如下:
package org.test;

import java.io.File;
import java.lang.reflect.Method;
import java.util.Properties;
import java.util.UUID;

import org.apache.zookeeper.server.ServerConfig;
import org.apache.zookeeper.server.ZooKeeperServerMain;
import org.apache.zookeeper.server.quorum.QuorumPeerConfig;
import org.slf4j.Logger;
import org.slf4j.LoggerFactory;
import org.springframework.context.SmartLifecycle;
import org.springframework.util.ErrorHandler;
import org.springframework.util.SocketUtils;

/**
 * from:
 * https://github.com/spring-projects/spring-xd/blob/v1.3.1.RELEASE/spring-xd-dirt/src/main/java/org/springframework/xd/dirt/zookeeper/ZooKeeperUtils.java
 *
 * Helper class to start an embedded instance of standalone (non clustered) ZooKeeper.
 *
 * NOTE: at least an external standalone server (if not an ensemble) are recommended, even for
 * {@link org.springframework.xd.dirt.server.singlenode.SingleNodeApplication}
 *
 * @author Patrick Peralta
 * @author Mark Fisher
 * @author David Turanski
 */
public class EmbeddedZooKeeper implements SmartLifecycle {

    /**
     * Logger.
     */
    private static final Logger logger = LoggerFactory.getLogger(EmbeddedZooKeeper.class);

    /**
     * ZooKeeper client port. This will be determined dynamically upon startup.
     */
    private final int clientPort;

    /**
     * Whether to auto-start. Default is true.
     */
    private boolean autoStartup = true;

    /**
     * Lifecycle phase. Default is 0.
     */
    private int phase = 0;

    /**
     * Thread for running the ZooKeeper server.
     */
    private volatile Thread zkServerThread;

    /**
     * ZooKeeper server.
     */
    private volatile ZooKeeperServerMain zkServer;

    /**
     * {@link ErrorHandler} to be invoked if an Exception is thrown from the ZooKeeper server thread.
     */
    private ErrorHandler errorHandler;

    private boolean daemon = true;

    /**
     * Construct an EmbeddedZooKeeper with a random port.
     */
    public EmbeddedZooKeeper() {
        clientPort = SocketUtils.findAvailableTcpPort();
    }

    /**
     * Construct an EmbeddedZooKeeper with the provided port.
     *
     * @param clientPort
     *            port for ZooKeeper server to bind to
     */
    public EmbeddedZooKeeper(int clientPort, boolean daemon) {
        this.clientPort = clientPort;
        this.daemon = daemon;
    }

    /**
     * Returns the port that clients should use to connect to this embedded server.
     *
     * @return dynamically determined client port
     */
    public int getClientPort() {
        return this.clientPort;
    }

    /**
     * Specify whether to start automatically. Default is true.
     *
     * @param autoStartup
     *            whether to start automatically
     */
    public void setAutoStartup(boolean autoStartup) {
        this.autoStartup = autoStartup;
    }

    /**
     * {@inheritDoc}
     */
    public boolean isAutoStartup() {
        return this.autoStartup;
    }

    /**
     * Specify the lifecycle phase for the embedded server.
     *
     * @param phase
     *            the lifecycle phase
     */
    public void setPhase(int phase) {
        this.phase = phase;
    }

    /**
     * {@inheritDoc}
     */
    public int getPhase() {
        return this.phase;
    }

    /**
     * {@inheritDoc}
     */
    public boolean isRunning() {
        return (zkServerThread != null);
    }

    /**
     * Start the ZooKeeper server in a background thread.
     * <p>
     * Register an error handler via {@link #setErrorHandler} in order to handle any exceptions thrown during startup or
     * execution.
     */
    public synchronized void start() {
        if (zkServerThread == null) {
            zkServerThread = new Thread(new ServerRunnable(), "ZooKeeper Server Starter");
            zkServerThread.setDaemon(daemon);
            zkServerThread.start();
        }
    }

    /**
     * Shutdown the ZooKeeper server.
     */
    public synchronized void stop() {
        if (zkServerThread != null) {
            // The shutdown method is protected...thus this hack to invoke it.
            // This will log an exception on shutdown; see
            // https://issues.apache.org/jira/browse/ZOOKEEPER-1873 for details.
            try {
                Method shutdown = ZooKeeperServerMain.class.getDeclaredMethod("shutdown");
                shutdown.setAccessible(true);
                shutdown.invoke(zkServer);
            }

            catch (Exception e) {
                throw new RuntimeException(e);
            }

            // It is expected that the thread will exit after
            // the server is shutdown; this will block until
            // the shutdown is complete.
            try {
                zkServerThread.join(5000);
                zkServerThread = null;
            } catch (InterruptedException e) {
                Thread.currentThread().interrupt();
                logger.warn("Interrupted while waiting for embedded ZooKeeper to exit");
                // abandoning zk thread
                zkServerThread = null;
            }
        }
    }

    /**
     * Stop the server if running and invoke the callback when complete.
     */
    public void stop(Runnable callback) {
        stop();
        callback.run();
    }

    /**
     * Provide an {@link ErrorHandler} to be invoked if an Exception is thrown from the ZooKeeper server thread. If none
     * is provided, only error-level logging will occur.
     *
     * @param errorHandler
     *            the {@link ErrorHandler} to be invoked
     */
    public void setErrorHandler(ErrorHandler errorHandler) {
        this.errorHandler = errorHandler;
    }

    /**
     * Runnable implementation that starts the ZooKeeper server.
     */
    private class ServerRunnable implements Runnable {

        public void run() {
            try {
                Properties properties = new Properties();
                File file = new File(System.getProperty("java.io.tmpdir") + File.separator + UUID.randomUUID());
                file.deleteOnExit();
                properties.setProperty("dataDir", file.getAbsolutePath());
                properties.setProperty("clientPort", String.valueOf(clientPort));

                QuorumPeerConfig quorumPeerConfig = new QuorumPeerConfig();
                quorumPeerConfig.parseProperties(properties);

                zkServer = new ZooKeeperServerMain();
                ServerConfig configuration = new ServerConfig();
                configuration.readFrom(quorumPeerConfig);

                zkServer.runFromConfig(configuration);
            } catch (Exception e) {
                if (errorHandler != null) {
                    errorHandler.handleError(e);
                } else {
                    logger.error("Exception running embedded ZooKeeper", e);
                }
            }
        }
    }

}
package org.test;

import org.apache.dubbo.config.spring.context.annotation.DubboComponentScan;
import org.springframework.boot.SpringApplication;
import org.springframework.boot.autoconfigure.SpringBootApplication;
import org.springframework.context.annotation.ComponentScan;
import org.springframework.transaction.annotation.EnableTransactionManagement;

/**
 *
 * @author cjb
 * @date 2019/10/24
 */
@EnableTransactionManagement
@ComponentScan(basePackages = {"org.test.config", "org.test.service.impl"})
@DubboComponentScan(basePackages = "org.test.service.impl")
@SpringBootApplication
public class ProviderApplication {

    public static void main(String[] args) {
        new EmbeddedZooKeeper(2181, false).start();
        SpringApplication app = new SpringApplication(ProviderApplication.class);
        app.run(args);
    }

}
创建实体包 org.test.entity以及创建实体类Test 用到了lombok,详细百度一下,eclipse装lombok插件
package org.test.entity;

import java.io.Serializable;
import java.time.LocalDateTime;

import com.baomidou.mybatisplus.annotation.IdType;
import com.baomidou.mybatisplus.annotation.TableField;
import com.baomidou.mybatisplus.annotation.TableId;

import io.swagger.annotations.ApiModel;
import io.swagger.annotations.ApiModelProperty;
import lombok.Data;
import lombok.EqualsAndHashCode;
import lombok.experimental.Accessors;

/**
 * <p>
 * 功能
 * </p>
 *
 * @author Funkye
 * @since 2019-04-23
 */
@Data
@EqualsAndHashCode(callSuper = false)
@Accessors(chain = true)
@ApiModel(value = "test对象", description = "功能")
public class Test implements Serializable {

    private static final long serialVersionUID = 1L;

    @ApiModelProperty(value = "主键")
    @TableId(value = "id", type = IdType.AUTO)
    private Integer id;

    @ApiModelProperty(value = "one")
    @TableField("one")
    private String one;

    @ApiModelProperty(value = "two")
    @TableField("two")
    private String two;

    @ApiModelProperty(value = "createTime")
    @TableField("createTime")
    private LocalDateTime createTime;

}
创建service,service.impl,mapper等包,依次创建ITestservice,以及实现类,mapper
package org.test.service;

import org.test.entity.Test;

import com.baomidou.mybatisplus.extension.service.IService;

/**
 * <p>
 * 功能 服务类
 * </p>
 *
 * @author Funkye
 * @since 2019-04-10
 */
public interface ITestService extends IService<Test> {

}
package org.test.service.impl;


import org.apache.dubbo.config.annotation.Service;
import org.test.entity.Test;
import org.test.mapper.TestMapper;
import org.test.service.ITestService;

import com.baomidou.mybatisplus.extension.service.impl.ServiceImpl;

@Service(version = "1.0.0",interfaceClass =ITestService.class )
public class TestServiceImpl extends ServiceImpl<TestMapper, Test> implements ITestService {

}
package org.test.mapper;

import org.test.entity.Test;

import com.baomidou.mybatisplus.core.mapper.BaseMapper;

/**
 * <p>
 * 功能 Mapper 接口
 * </p>
 *
 * @author Funkye
 * @since 2019-04-10
 */
public interface TestMapper extends BaseMapper<Test> {

}
创建org.test.config包,创建SeataAutoConfig.java,配置信息都在此处,主要作用为代理数据,连接事务服务分组
package org.test.config;

import javax.sql.DataSource;

import org.slf4j.Logger;
import org.slf4j.LoggerFactory;
import org.springframework.beans.factory.annotation.Autowired;
import org.springframework.beans.factory.annotation.Qualifier;
import org.springframework.boot.autoconfigure.jdbc.DataSourceProperties;
import org.springframework.context.annotation.Bean;
import org.springframework.context.annotation.Configuration;
import org.springframework.context.annotation.Primary;

import com.alibaba.druid.pool.DruidDataSource;

import io.seata.rm.datasource.DataSourceProxy;
import io.seata.spring.annotation.GlobalTransactionScanner;

@Configuration
public class SeataAutoConfig {
	@Autowired(required = true)
	private DataSourceProperties dataSourceProperties;
	private final static Logger logger = LoggerFactory.getLogger(SeataAutoConfig.class);

	@Bean(name = "druidDataSource") // 声明其为Bean实例
	public DataSource druidDataSource() {
		DruidDataSource druidDataSource = new DruidDataSource();
		logger.info("dataSourceProperties.getUrl():{}", dataSourceProperties.getUrl());
		druidDataSource.setUrl(dataSourceProperties.getUrl());
		druidDataSource.setUsername(dataSourceProperties.getUsername());
		druidDataSource.setPassword(dataSourceProperties.getPassword());
		druidDataSource.setDriverClassName(dataSourceProperties.getDriverClassName());
		druidDataSource.setInitialSize(0);
		druidDataSource.setMaxActive(180);
		druidDataSource.setMaxWait(60000);
		druidDataSource.setMinIdle(0);
		druidDataSource.setValidationQuery("Select 1 from DUAL");
		druidDataSource.setTestOnBorrow(false);
		druidDataSource.setTestOnReturn(false);
		druidDataSource.setTestWhileIdle(true);
		druidDataSource.setTimeBetweenEvictionRunsMillis(60000);
		druidDataSource.setMinEvictableIdleTimeMillis(25200000);
		druidDataSource.setRemoveAbandoned(true);
		druidDataSource.setRemoveAbandonedTimeout(1800);
		druidDataSource.setLogAbandoned(true);
		logger.info("装载dataSource........");
		return druidDataSource;
	}

	/**
	 * init datasource proxy
	 *
	 * @Param: druidDataSource datasource bean instance
	 * @Return: DataSourceProxy datasource proxy
	 */
	@Bean(name = "dataSource")
	@Primary // 在同样的DataSource中,首先使用被标注的DataSource
	public DataSourceProxy dataSourceProxy(@Qualifier(value = "druidDataSource") DruidDataSource druidDataSource) {
		logger.info("代理dataSource........");
		return new DataSourceProxy(druidDataSource);
	}

	/**
	 * init global transaction scanner
	 *
	 * @Return: GlobalTransactionScanner
	 */
	@Bean
	public GlobalTransactionScanner globalTransactionScanner() {
		logger.info("配置seata........");
		return new GlobalTransactionScanner("test-service", "test-group");
	}
}
再创建mybatisplus所需的配置文件MybatisPlusConfig
package org.test.config;

import java.util.ArrayList;
import java.util.List;

import org.mybatis.spring.mapper.MapperScannerConfigurer;
import org.springframework.context.annotation.Bean;
import org.springframework.context.annotation.Configuration;

import com.baomidou.mybatisplus.core.parser.ISqlParser;
import com.baomidou.mybatisplus.extension.parsers.BlockAttackSqlParser;
import com.baomidou.mybatisplus.extension.plugins.PaginationInterceptor;

@Configuration
// @MapperScan("com.baomidou.springboot.mapper*")//这个注解,作用相当于下面的@Bean
// MapperScannerConfigurer,2者配置1份即可
public class MybatisPlusConfig {

    /**
     * mybatis-plus分页插件<br>
     * 文档:http://mp.baomidou.com<br>
     */
    @Bean
    public PaginationInterceptor paginationInterceptor() {
        PaginationInterceptor paginationInterceptor = new PaginationInterceptor();
        List<ISqlParser> sqlParserList = new ArrayList<ISqlParser>();
        // 攻击 SQL 阻断解析器、加入解析链
        sqlParserList.add(new BlockAttackSqlParser());
        paginationInterceptor.setSqlParserList(sqlParserList);
        return paginationInterceptor;
    }

    /**
     * 相当于顶部的: {@code @MapperScan("com.baomidou.springboot.mapper*")} 这里可以扩展,比如使用配置文件来配置扫描Mapper的路径
     */

    @Bean
    public MapperScannerConfigurer mapperScannerConfigurer() {
        MapperScannerConfigurer scannerConfigurer = new MapperScannerConfigurer();
        scannerConfigurer.setBasePackage("org.test.mapper");
        return scannerConfigurer;
    }

}
再创建resources目录,创建mapper文件夹,application.yml等文件
server:
  port: 38888
spring:
  application:
      name: test-service
  datasource:
    type: com.alibaba.druid.pool.DruidDataSource
    url: jdbc:mysql://127.0.0.1:3306/test?useUnicode=true&characterEncoding=UTF-8&serverTimezone=UTC
    driver-class-name: com.mysql.cj.jdbc.Driver
    username: root
    password: 123456
dubbo:
  protocol:
    loadbalance: leastactive
    threadpool: cached
  scan:
    base-packages: org。test.service
  application:
    qos-enable: false
    name: testserver
  registry:
    id: my-registry
    address:  zookeeper://127.0.0.1:2181?client=curator
mybatis-plus:
  mapper-locations: classpath:/mapper/*Mapper.xml
  typeAliasesPackage: org.test.entity
  global-config:
    db-config:
      field-strategy: not-empty
      id-type: auto
      db-type: mysql
  configuration:
    map-underscore-to-camel-case: true
    cache-enabled: true
    auto-mapping-unknown-column-behavior: none
创建file.conf,此处的service 内的vgroup_mapping.你的事务分组,比如上面SeataAutoConfig内配置了test-group,那么这里也要改为test-group,然后下面ip端口都是seata运行的ip跟端口就行了
transport {
  type = "TCP"
  server = "NIO"
  heartbeat = true
  thread-factory {
    boss-thread-prefix = "NettyBoss"
    worker-thread-prefix = "NettyServerNIOWorker"
    server-executor-thread-prefix = "NettyServerBizHandler"
    share-boss-worker = false
    client-selector-thread-prefix = "NettyClientSelector"
    client-selector-thread-size = 1
    client-worker-thread-prefix = "NettyClientWorkerThread"
    boss-thread-size = 1
    worker-thread-size = 8
  }
  shutdown {
    wait = 3
  }
  serialization = "seata"
  compressor = "none"
}
service {
  vgroup_mapping.test-group = "default"
  default.grouplist = "127.0.0.1:8091"
  enableDegrade = false
  disable = false
  max.commit.retry.timeout = "-1"
  max.rollback.retry.timeout = "-1"
}

client {
  async.commit.buffer.limit = 10000
  lock {
    retry.internal = 10
    retry.times = 30
  }
  report.retry.count = 5
  tm.commit.retry.count = 1
  tm.rollback.retry.count = 1
  undo.log.table = "undo_log"
}

recovery {
  committing-retry-period = 1000
  asyn-committing-retry-period = 1000
  rollbacking-retry-period = 1000
  timeout-retry-period = 1000
}

transaction {
  undo.data.validation = true
  undo.log.serialization = "jackson"
  undo.log.save.days = 7
  undo.log.delete.period = 86400000
  undo.log.table = "undo_log"
}

metrics {
  enabled = false
  registry-type = "compact"
  exporter-list = "prometheus"
  exporter-prometheus-port = 9898
}

support {
  spring {
    datasource.autoproxy = false
  }
}
创建registry.conf,来指定file,zk的ip端口之类的配置
registry {
  type = "file"
  file {
    name = "file.conf"
  }
}
config {
  type = "file"
  file {
    name = "file.conf"
  }
  zk {
    serverAddr = "127.0.0.1:2181"
    session.timeout = 6000
    connect.timeout = 2000
  }
}
大功告成,可以直接运行啦,这时候观察seata-server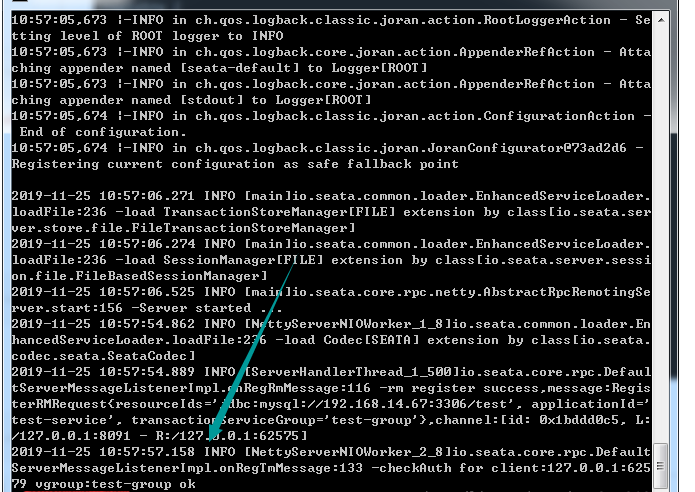
接下来我们创建test-client项目项目,这里就不赘述了,跟上面的test-service一样的创建方式
接下来我们复制test-service内的service跟实体过去,当然你嫌麻烦,可以单独搞个子项目放通用的service跟实体,一些工具类等等,我这边为了快速搭建这个demo,就选择复制黏贴的方式了.
目录结构: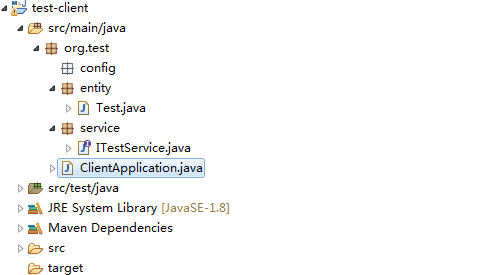
然后我们创建ClientApplication:
package org.test;

import java.util.TimeZone;
import java.util.concurrent.Executor;

import org.apache.dubbo.config.spring.context.annotation.EnableDubbo;
import org.springframework.boot.SpringApplication;
import org.springframework.boot.autoconfigure.SpringBootApplication;
import org.springframework.boot.autoconfigure.jdbc.DataSourceAutoConfiguration;
import org.springframework.context.annotation.Bean;
import org.springframework.context.annotation.ComponentScan;
import org.springframework.context.annotation.Configuration;
import org.springframework.scheduling.annotation.EnableAsync;
import org.springframework.scheduling.annotation.EnableScheduling;
import org.springframework.scheduling.concurrent.ThreadPoolTaskExecutor;

import com.baomidou.mybatisplus.autoconfigure.MybatisPlusAutoConfiguration;

@SpringBootApplication(exclude = {DataSourceAutoConfiguration.class, MybatisPlusAutoConfiguration.class})
@EnableScheduling
@EnableAsync
@Configuration
@EnableDubbo(scanBasePackages = {"org.test.service"})
@ComponentScan(basePackages = {"org.test.service", "org.test.controller", "org.test.config"})
public class ClientApplication {
    public static void main(String[] args) {
        TimeZone.setDefault(TimeZone.getTimeZone("Asia/Shanghai"));
        SpringApplication app = new SpringApplication(ClientApplication.class);
        app.run(args);
    }

    @Bean(name = "threadPoolTaskExecutor")
    public Executor threadPoolTaskExecutor() {
        return new ThreadPoolTaskExecutor();
    }
}
再到config包内创建SwaggerConfig :
package org.test.config;

import java.util.ArrayList;
import java.util.List;

import org.springframework.context.annotation.Bean;
import org.springframework.context.annotation.Configuration;

import springfox.documentation.builders.ApiInfoBuilder;
import springfox.documentation.builders.PathSelectors;
import springfox.documentation.builders.RequestHandlerSelectors;
import springfox.documentation.service.ApiInfo;
import springfox.documentation.service.Contact;
import springfox.documentation.service.Parameter;
import springfox.documentation.spi.DocumentationType;
import springfox.documentation.spring.web.plugins.Docket;
import springfox.documentation.swagger2.annotations.EnableSwagger2;

@Configuration
@EnableSwagger2
public class SwaggerConfig {
    // swagger2的配置文件,这里可以配置swagger2的一些基本的内容,比如扫描的包等等
    @Bean
    public Docket createRestApi() {
        List<Parameter> pars = new ArrayList<Parameter>();
        return new Docket(DocumentationType.SWAGGER_2).apiInfo(apiInfo()).select()
            // 为当前包路径
            .apis(RequestHandlerSelectors.basePackage("org.test.controller")).paths(PathSelectors.any()).build()
            .globalOperationParameters(pars);
    }

    // 构建 api文档的详细信息函数,注意这里的注解引用的是哪个
    private ApiInfo apiInfo() {
        return new ApiInfoBuilder()
            // 页面标题
            .title("项目接口")
            // 创建人
            .contact(new Contact("FUNKYE", "", ""))
            // 版本号
            .version("1.0")
            // 描述
            .description("API 描述").build();
    }
}
再创建SpringMvcConfigure,再里面放入seata的配置,我为了偷懒直接集成在mvc配置的类里了,大家规范点可以另外创建个配置seata的类,大家可以发现下面还是有个组名称,我把两个项目都分配到一个组去,貌似另外取一个也没事的.
package org.test.config;

import java.nio.charset.Charset;
import java.util.ArrayList;
import java.util.List;
import java.util.Map;

import org.apache.dubbo.config.annotation.Reference;
import org.springframework.boot.web.servlet.FilterRegistrationBean;
import org.springframework.context.annotation.Bean;
import org.springframework.context.annotation.Configuration;
import org.springframework.core.Ordered;
import org.springframework.http.MediaType;
import org.springframework.http.converter.HttpMessageConverter;
import org.springframework.http.converter.StringHttpMessageConverter;
import org.springframework.web.cors.CorsConfiguration;
import org.springframework.web.cors.UrlBasedCorsConfigurationSource;
import org.springframework.web.filter.CorsFilter;
import org.springframework.web.servlet.HandlerInterceptor;
import org.springframework.web.servlet.config.annotation.InterceptorRegistry;
import org.springframework.web.servlet.config.annotation.WebMvcConfigurer;
import org.springframework.web.servlet.view.InternalResourceViewResolver;

import com.alibaba.fastjson.serializer.SerializerFeature;
import com.alibaba.fastjson.support.config.FastJsonConfig;
import com.alibaba.fastjson.support.spring.FastJsonHttpMessageConverter;
import com.google.common.collect.Maps;

import io.seata.spring.annotation.GlobalTransactionScanner;

@Configuration
public class SpringMvcConfigure implements WebMvcConfigurer {

    @Bean
    public FilterRegistrationBean corsFilter() {
        UrlBasedCorsConfigurationSource source = new UrlBasedCorsConfigurationSource();
        CorsConfiguration config = new CorsConfiguration();
        config.setAllowCredentials(true);
        config.addAllowedOrigin("*");
        config.addAllowedHeader(CorsConfiguration.ALL);
        config.addAllowedMethod(CorsConfiguration.ALL);
        source.registerCorsConfiguration("/**", config);
        FilterRegistrationBean filterRegistrationBean = new FilterRegistrationBean(new CorsFilter(source));
        filterRegistrationBean.setOrder(Ordered.HIGHEST_PRECEDENCE);
        filterRegistrationBean.setOrder(1);
        filterRegistrationBean.setEnabled(true);
        filterRegistrationBean.addUrlPatterns("/**");
        Map<String, String> initParameters = Maps.newHashMap();
        initParameters.put("excludes", "/favicon.ico,/img/*,/js/*,/css/*");
        initParameters.put("isIncludeRichText", "true");
        filterRegistrationBean.setInitParameters(initParameters);
        return filterRegistrationBean;
    }

    @Bean
    public InternalResourceViewResolver viewResolver() {
        InternalResourceViewResolver viewResolver = new InternalResourceViewResolver();
        viewResolver.setPrefix("/WEB-INF/jsp/");
        viewResolver.setSuffix(".jsp");
        // viewResolver.setViewClass(JstlView.class);
        // 这个属性通常并不需要手动配置,高版本的Spring会自动检测
        return viewResolver;
    }


    /**
     * 替换框架json为fastjson
     */
    @Override
    public void configureMessageConverters(List<HttpMessageConverter<?>> converters) {
        FastJsonHttpMessageConverter fastConverter = new FastJsonHttpMessageConverter();
        FastJsonConfig fastJsonConfig = new FastJsonConfig();
        fastJsonConfig.setSerializerFeatures(SerializerFeature.PrettyFormat, SerializerFeature.WriteMapNullValue,
            SerializerFeature.WriteNullStringAsEmpty, SerializerFeature.DisableCircularReferenceDetect);
        // 处理中文乱码问题
        List<MediaType> fastMediaTypes = new ArrayList<>();
        fastMediaTypes.add(MediaType.APPLICATION_JSON_UTF8);
        fastConverter.setSupportedMediaTypes(fastMediaTypes);
        fastConverter.setFastJsonConfig(fastJsonConfig);
        // 处理字符串, 避免直接返回字符串的时候被添加了引号
        StringHttpMessageConverter smc = new StringHttpMessageConverter(Charset.forName("UTF-8"));
        converters.add(smc);
        converters.add(fastConverter);
    }

    @Bean
    public GlobalTransactionScanner globalTransactionScanner() {
        return new GlobalTransactionScanner("test-client", "test-group");
    }

}
再创建controller包,再包下创建TestController :
package org.test.controller;

import org.slf4j.Logger;
import org.slf4j.LoggerFactory;
import org.springframework.beans.factory.annotation.Autowired;
import org.springframework.context.annotation.Lazy;
import org.springframework.web.bind.annotation.GetMapping;
import org.springframework.web.bind.annotation.RequestMapping;
import org.springframework.web.bind.annotation.RestController;
import org.test.service.DemoService;

import io.swagger.annotations.Api;
import io.swagger.annotations.ApiOperation;

/**
 * <p>
 * 文件表 前端控制器
 * </p>
 *
 * @author funkye
 * @since 2019-03-20
 */
@RestController
@RequestMapping("/test")
@Api(tags = "测试接口")
public class TestController {

    private final static Logger logger = LoggerFactory.getLogger(TestController.class);
    @Autowired
    @Lazy
    DemoService demoService;

    @GetMapping(value = "testSeataOne")
    @ApiOperation(value = "测试手动回滚分布式事务接口")
    public Object testSeataOne() {
        return demoService.One();
    }

    @GetMapping(value = "testSeataTwo")
    @ApiOperation(value = "测试异常回滚分布式事务接口")
    public Object testSeataTwo() {
        return demoService.Two();
    }

}
再到service去创建需要依赖的DemoService
package org.test.service;

import java.time.LocalDateTime;

import org.apache.dubbo.config.annotation.Reference;
import org.slf4j.Logger;
import org.slf4j.LoggerFactory;
import org.springframework.stereotype.Service;
import org.test.controller.TestController;
import org.test.entity.Test;

import io.seata.core.context.RootContext;
import io.seata.core.exception.TransactionException;
import io.seata.spring.annotation.GlobalTransactional;
import io.seata.tm.api.GlobalTransactionContext;

@Service
public class DemoService {
	@Reference(version = "1.0.0", timeout = 60000)
	private ITestService testService;
	private final static Logger logger = LoggerFactory.getLogger(DemoService.class);

	/**
	 * 手动回滚示例
	 *
	 * @return
	 */
	@GlobalTransactional
	public Object One() {
		logger.info("seata分布式事务Id:{}", RootContext.getXID());
		Test t = new Test();
		t.setOne("1");
		t.setTwo("2");
		t.setCreateTime(LocalDateTime.now());
		testService.save(t);
		try {
			int i = 1 / 0;
			return true;
		} catch (Exception e) {
			// TODO: handle exception
			try {
				logger.info("载入事务id进行回滚");
				GlobalTransactionContext.reload(RootContext.getXID()).rollback();
			} catch (TransactionException e1) {
				// TODO Auto-generated catch block
				e1.printStackTrace();
			}
		}
		return false;
	}

	/**
	 * 抛出异常进行回滚示例
	 *
	 * @return
	 */
	@GlobalTransactional
	public Object Two() {
		logger.info("seata分布式事务Id:{}", RootContext.getXID());
		Test t = new Test();
		t.setOne("1");
		t.setTwo("2");
		t.setCreateTime(LocalDateTime.now());
		testService.save(t);
		try {
			int i = 1 / 0;
			return true;
		} catch (Exception e) {
			// TODO: handle exception
			throw new RuntimeException();
		}
	}
}
一样创建resources文件夹,先创建常用的application.yml
spring:
  application:
     name: test
  datasource:
     driver-class-name: com.mysql.cj.jdbc.Driver
     url: jdbc:mysql://127.0.0.1:3306/test?userSSL=true&useUnicode=true&characterEncoding=UTF8&serverTimezone=Asia/Shanghai
     username: root
     password: 123456
  mvc:
    servlet:
      load-on-startup: 1
  http:
    encoding:
            force: true
            charset: utf-8
            enabled: true
    multipart:
      max-file-size: 10MB
      max-request-size: 10MB
dubbo:
  registry:
    id: my-registry
    address:  zookeeper://127.0.0.1:2181?client=curator
#    address:  zookeeper://127.0.0.1:2181?client=curator
  application:
    name: dubbo-demo-client
    qos-enable: false
server:
  port: 28888
  max-http-header-size: 8192
  address: 0.0.0.0
  tomcat:
    max-http-post-size: 104857600
再把之前service配置好的file跟registry文件复制来,如果你的client组名称再配置�类里修改了,那么这里的file文件内的组名称一样需要更改.
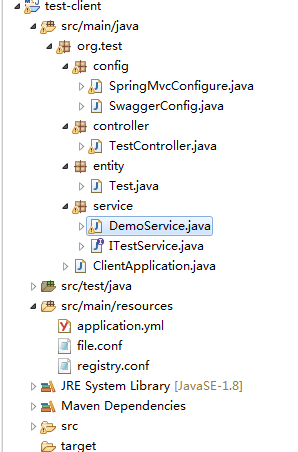
完整的目录结构如上,这时候可以启动test-service后,再启动test-client,到swagger里测试咯
4.访问127.0.0.1:28888/swagger-ui.html做最后的收尾 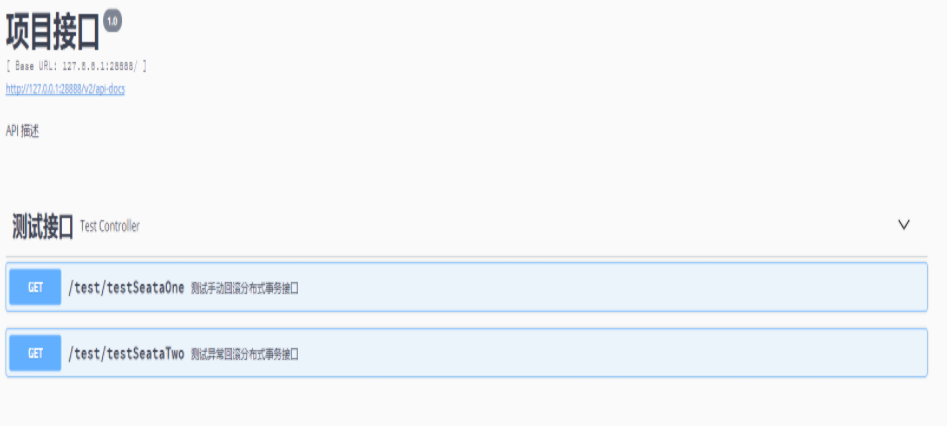

这里数据我已经存了一条记录了,我们看看会不会成功回滚:
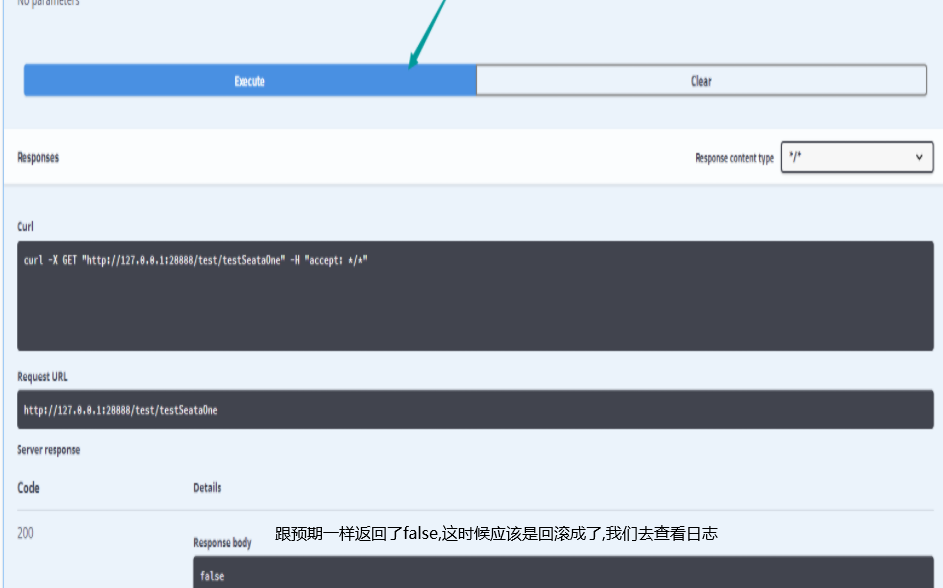
刷新数据库,发现还是只有一条数据:
再查看日志:

显示已经回滚,我们再看看seata-server的日志:
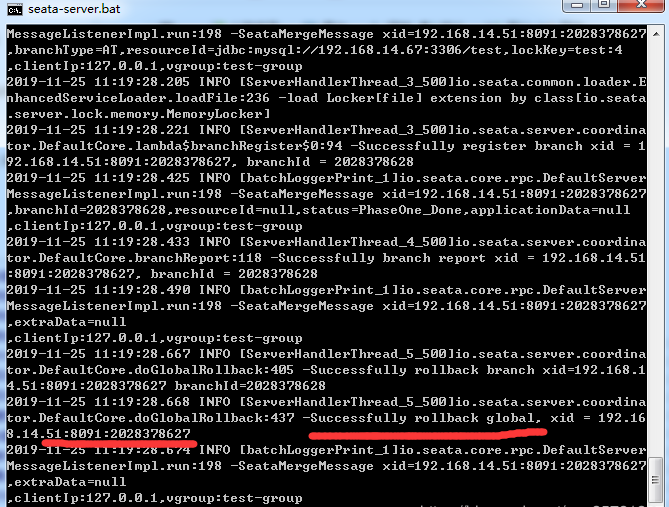
显示回滚成功,事务id也是一致的,这下我们的分布式事务就跑通咯,通过打断点方式,大家可以查看undo_log,会发现再事务提交前,会存入一条事务信息的数据,如果回滚成功,该信息就会被删除.
总结
seata的整合还是比较简单易入手,稍微用心一些你肯定写的比我更好!
欢迎大家也多去阅读seata,dubbo之类的源代码,能解决业务中遇到的大量的坑哦!